
A structured 3D visualisation design presentation workflow is the difference between a project that wins approval and one that stalls in revision cycles. Architectural visualisation, the professional practice of producing photorealistic or near-photorealistic images and animations from design data, now sits at the centre of every serious property development, planning application, and interior design pitch. The most effective approach in 2026 combines real-time and photorealistic rendering in a hybrid model, layered with AI assistance, strict version control, and immersive storytelling. Professionals who adopt this structure move faster, iterate more confidently, and present with far greater impact.
What are the essential tools for a 3D visualisation design presentation workflow?
The right toolset defines the ceiling of your workflow. Real-time rendering engines such as Enscape and Chaos Vantage allow you to walk through a scene and adjust lighting or materials within seconds. That speed is not a luxury. It is the mechanism that makes early-stage client conversations productive rather than speculative.
For final presentation outputs, offline photorealistic rendering remains the standard. These engines produce images that can take hours or days to compute, but the quality justifies the wait for planning submissions, investor decks, and marketing campaigns. The distinction matters: real-time for exploration, photorealistic for high-stakes presentation is the governing principle of a hybrid workflow.
AI tools now handle upscaling, material refinement, and repetitive texture work. They accelerate production without replacing the judgement of an experienced visualiser. Version control systems, whether cloud-based or local, and well-organised material libraries are equally non-negotiable. Losing a lighting setup or a material variant because files were not versioned properly is one of the most avoidable time losses in the 3D design workflow.
Hardware also shapes output quality. A workstation with a high-core-count CPU, a professional GPU with at least 24GB VRAM, and fast NVMe storage removes the bottlenecks that slow iterative rendering.
Key tool categories at a glance:
- Real-time engines: Enscape, Chaos Vantage (interactive walkthroughs, fast iteration)
- Offline renderers: High-quality photorealistic engines for final outputs
- AI assistance: Upscaling, material generation, automated compositing
- Version control: Incremental saves, cloud sync, named scene states
- Material libraries: Calibrated, physically based materials for consistent results
- Hardware: Professional GPU, fast storage, sufficient RAM for large scene files
Pro Tip: Build your material library before a project starts, not during it. Pre-calibrated, physically based materials cut mid-project delays and keep your renders consistent across every output.
How to structure your 3D visualisation workflow for iterative design and client collaboration
The brief is not a fixed document. Treating it as a collaborative, evolving conversation changes the entire dynamic of a project. Clients revisit earlier options weeks after they were supposedly discarded. A workflow that cannot retrieve those options without rebuilding from scratch wastes significant time and erodes trust.
Structure your scene from day one with swappable layers. Lighting rigs, material sets, and camera positions should all be named, saved, and retrievable independently. This is not over-engineering. It is the minimum standard for any project where the client has decision-making authority.
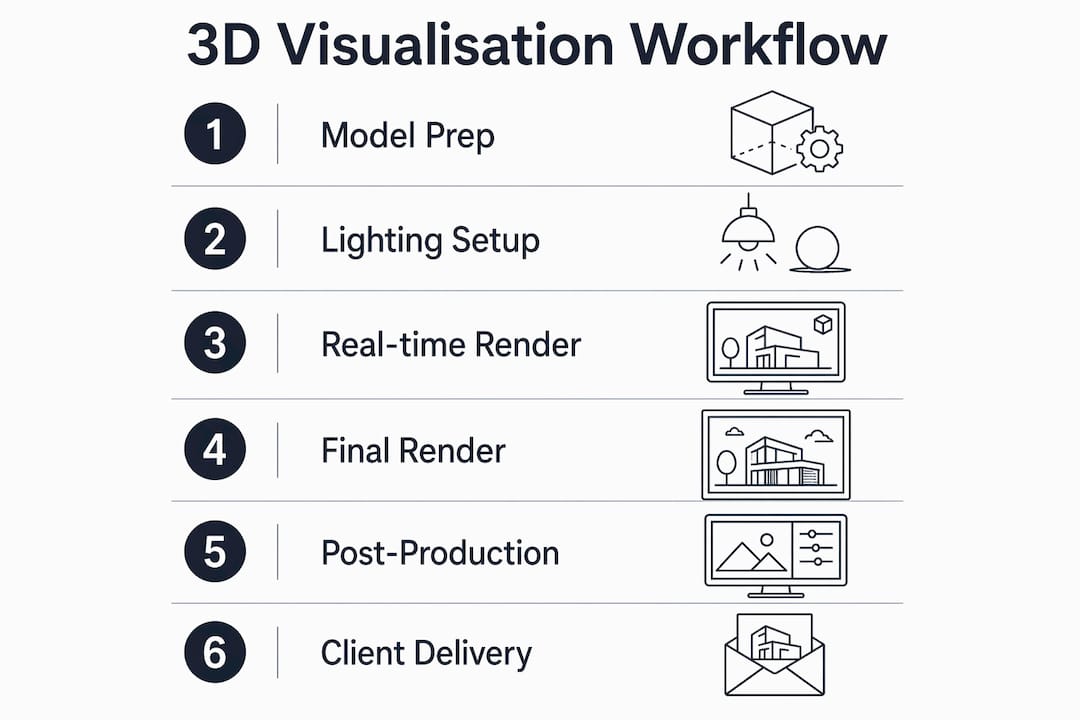
A practical iterative structure looks like this:
- Brief intake and scene setup. Agree on deliverable types, camera angles, and key decision points before modelling begins. Document everything in a shared brief that both parties can annotate.
- Low-quality real-time outputs for internal review. Use your real-time engine to produce fast, readable images for internal sign-off. These are not client-facing. They exist to catch geometry errors and composition problems early.
- Client-facing draft renders. Produce mid-quality outputs at agreed milestones. These give clients enough visual information to make decisions without committing render farm time to a scene that may change.
- Feedback loop and version commit. Log every change request against a version number. Save the previous state before applying changes. This is the step most professionals skip and later regret.
- Interactive walkthrough session. Before final rendering, run a real-time walkthrough with the client. Real-time tools provide instant visual feedback and surface last-minute changes at the cheapest possible stage.
- Final photorealistic render. Only commit to high-quality offline rendering once the scene is locked. This protects render time and avoids costly re-renders.
Strict scene and material versioning from day one prevents wasted effort and preserves design options that clients will inevitably want to revisit.
Pro Tip: Name every scene state with a date and a brief description, for example “v03_kitchen_warm-lighting_client-approved.” That naming convention takes ten seconds and saves hours when a client asks to return to a previous option.
What are the step-by-step processes from model to presentation-ready visuals?
Moving from raw CAD or BIM data to a presentation-ready image requires disciplined preparation at every stage. Clean data, optimised geometry, calibrated materials, and disciplined lighting are the four pillars of consistent, high-quality output. Skipping preparation to save time at the start always costs more time later.
Model preparation and geometry optimisation
Import your CAD or BIM data and audit it immediately. Remove duplicate geometry, fix inverted normals, and collapse unnecessary polygon counts in areas the camera will never see. A clean scene renders faster and produces fewer artefacts.
Lighting and camera setup
Set your primary light source first, whether that is a sun position for exterior work or a key artificial light for interiors. Calibrate your camera exposure to match real-world values. Lock your camera positions as named states before you begin any material work. Changing camera angles after materials are assigned creates unnecessary rework.
Real-time iterative rendering for internal reviews
Run your scene through your real-time engine and produce a set of internal review images. These should be fast, clear, and focused on composition and spatial relationships. Share them with your design team before any client sees the project.
Photorealistic offline rendering for final approvals
Once the scene is approved internally, switch to your offline renderer. Set your render quality parameters, assign final materials, and run test patches on key areas before committing to a full render. A test patch on a 400 x 400 pixel crop takes minutes and catches material errors that would otherwise waste hours.
Post-production techniques
Subtle camera imperfections in post-production increase photorealism and emotional impact. A restrained vignette, minimal chromatic aberration, and light film grain make a render feel like a photograph rather than a computer-generated image. The key word is restrained. Over-processing destroys the effect.
Final output and client presentation
Export at the agreed resolution and format. For planning submissions, check the local authority’s specification before rendering. For marketing, produce both print-resolution and web-optimised versions. Present images in context, whether that is a branded PDF, an interactive viewer, or a live walkthrough session. Context shapes how clients perceive quality.
Which common mistakes should professionals avoid in 3D visualisation workflows?
The most damaging mistake is treating the 3D model as a disposable production asset rather than a dynamic database. Visualising 3D models as dynamic databases with strict versioning avoids time-consuming rebuilds when designs change. Every model should be structured so that any element can be swapped, hidden, or retrieved without rebuilding the scene.
Common pitfalls to avoid:
- Skipping version control. Overwriting files without saving previous states is the single most common cause of avoidable rework.
- Over-polishing in post-production. Heavy-handed grading and excessive effects reduce believability. Subtle imperfections add emotional connection; heavy processing removes it.
- Using AI outputs without refinement. AI outputs must not be used directly without refinement. Quality control is a bottleneck that cannot be automated away.
- Committing to final renders too early. Running a full photorealistic render before the client has approved the composition wastes render time and often requires a complete re-run.
- Inconsistent material calibration. Materials that are not physically based or not calibrated to the same lighting environment produce renders that look mismatched across a project.
“Over-polishing in post-production can reduce believability. The renders that feel most real are the ones that retain a degree of imperfection. Knowing when to stop is as important as knowing how to start.”
Managing render time is also a discipline. Set quality targets for each output type and stick to them. A client-facing draft does not need the same sample count as a final planning submission. Matching quality to purpose keeps the workflow moving without burning unnecessary compute time.
Key takeaways
A hybrid workflow combining real-time iteration and photorealistic final rendering is the most effective structure for architectural visualisation projects in 2026.
| Point | Details |
|---|---|
| Use a hybrid rendering approach | Real-time engines handle iteration; offline renderers produce final presentation-quality outputs. |
| Version everything from day one | Named scene states and material saves prevent costly rebuilds when clients revisit earlier options. |
| Treat the brief as a live document | Collaborative, evolving briefs improve flexibility and reduce late-stage surprises. |
| Apply post-production with restraint | Subtle effects like vignette and film grain increase realism; heavy processing reduces it. |
| Audit AI outputs before use | AI accelerates repetitive tasks but requires human review before any output reaches a client. |
Why the visualiser’s role in a project matters more than most teams realise
The shift I have seen most clearly over the past several years is this: the visualiser used to be called in at the end, handed a model, and asked to make it look good. That approach produces mediocre results and wastes the most valuable thing a visualiser can offer, which is early-stage spatial and compositional insight.
When I work on a project from the brief stage, I can flag camera angles that will not read well, lighting conditions that will flatten the architecture, and material combinations that will clash in render even if they look fine on a mood board. None of that is visible in a floor plan. It only becomes visible when you start building the scene.
The visualiser’s role has shifted to strategic design partner engaging early in the brief. I think this is the most important structural change in the profession. It means the workflow is not a production pipeline that starts after design decisions are made. It is a design tool that informs those decisions in real time.
AI is genuinely useful in this context, but I am cautious about over-relying on it. AI acts as a creative assistant for repetitive tasks, not a replacement for the judgement that comes from understanding what a client actually needs to see. The professionals who use AI well are the ones who treat it as a production accelerator, not a creative decision-maker.
The emotional impact of a well-constructed visualisation is also underestimated. A render that tells a story, that shows how light moves through a space at a specific time of day, or how a garden feels in late afternoon, wins approvals that a technically correct but emotionally flat image does not. That storytelling is a craft. It takes time to develop and it cannot be automated.
— Paride
How Visualtrick supports your design presentation workflow
Visualtrick produces architectural visualisation for architects, interior designers, property developers, and planning consultants across the UK and worldwide. Every project is built around the hybrid workflow principles covered in this article: real-time iteration for early-stage collaboration, photorealistic rendering for final submissions and marketing, and post-production that prioritises realism over spectacle.

Whether you need CGI for architects to support a planning application, visuals for an investor pitch, or presentation-ready images for a property marketing campaign, Visualtrick delivers clean, accurate, and planning-ready outputs at every stage. Contact Visualtrick to discuss your project and find out how a structured visualisation workflow can strengthen your next presentation.
FAQ
What is a 3D visualisation design presentation workflow?
A 3D visualisation design presentation workflow is the structured process of moving from raw design data to client-ready rendered images or animations. It covers model preparation, lighting, iterative rendering, client feedback, and final output formatting.
When should real-time rendering be used versus photorealistic rendering?
Real-time rendering suits internal reviews and client walkthrough sessions where speed and interactivity matter. Photorealistic offline rendering is reserved for final planning submissions, marketing materials, and investor presentations where image quality is the priority.
How does version control improve a 3D visualisation workflow?
Version control preserves every named scene state, material set, and camera position so that earlier design options can be retrieved without rebuilding. Clients frequently revisit discarded options, and a versioned workflow makes that retrieval fast and cost-free.
What role does AI play in architectural visualisation workflows?
AI automates repetitive tasks such as upscaling, material generation, and compositing, but every AI output requires human review before it reaches a client. AI accelerates production; it does not replace the quality control and creative judgement of an experienced visualiser.
How do post-production techniques affect the quality of a final render?
Subtle effects such as vignette, restrained chromatic aberration, and light film grain make renders feel more photographic and emotionally engaging. Over-processing has the opposite effect and reduces the believability of the final image.
