
Run every render through a fixed sequence: a Camera Raw exposure pass, compositing of your utility passes, colour grading, atmosphere, cleanup, and export, using AI only for targeted precision edits and upscaling. Follow this with Adobe Photoshop as your compositing engine and you get a consistent studio look across a whole project, faster iterations, and images that are genuinely ready to put in front of a client rather than a rough draft that still needs work. Every studio builds every deliverable around this same logic.
TL;DR:
- Using a full set of render passes, including Z-Depth, AO, Reflection, Material ID, and Lighting, provides precise control during post-production.
- AI tools are best suited for targeted edits, background upscaling, and generative fill, but should never replace foundational pass-based workflows.
- Maintaining a disciplined, repeatable workflow with layered PSD files, preset exports, and consistent grading practices significantly enhances studio quality and efficiency.
- For projects requiring high accuracy, especially in planning submissions, a standardized pipeline and thorough quality control are essential to avoid inconsistencies.
- Outsourcing to a professional studio makes sense for high-volume, time-constrained projects that demand final, client-ready images with reliable, consistent quality.
Table of Contents
- What archviz post production actually does in the pipeline
- The render passes you need and how to export them
- How do you build a repeatable Photoshop post production workflow?
- Where AI genuinely helps, and where it doesn’t
- Common post-production mistakes that flatten a good render
- How a studio structures post-production for planning and marketing work
- Colour grading rules that actually apply to architectural work
- Blending 3D renders into photographic backgrounds
- Batch processing multiple renders without losing quality
- Export settings for client presentations and portfolios
- The workflow discipline that actually separates good archviz studios
- Need a studio to handle this end to end?
- Sources
- FAQ
What archviz post production actually does in the pipeline
A raw render out of V-Ray, Corona, or Enscape is neutral by design. The renderer’s job is to solve lighting and geometry accurately, not to make a scene feel inviting, dramatic, or sellable. Archviz post production is where that neutral output becomes a piece of marketing or planning communication with mood, depth, and a story that engages viewers. Skip it, and even a technically flawless render reads as sterile.
The trick is knowing which fixes belong where. Send a render back for re-rendering when the problem is structural. Save everything subjective for Photoshop.
Fix in the render engine:
- Geometry errors, clipping, or missing objects
- Incorrect primary light direction or exposure that clips highlights/shadows badly
- Material assignment mistakes visible in reflections
Fix in post-production:
- Colour grading and mood
- Entourage placement, people, cars, foliage detail
- Final art direction: contrast, atmosphere, focal emphasis
A polished image typically takes under an hour once the render passes are clean, according to the step-by-step Photoshop workflow documented by ArchFine. Heavy sky replacement, complex masking, or a client asking for multiple mood variants push that comfortably past the hour mark.
The render passes you need and how to export them
Compositing quality is capped by what you exported from the renderer. A beauty pass alone forces you into destructive, global edits. A full pass set gives you surgical control over every material and light source without touching the rest of the image.
Export these as a minimum:
- Beauty pass: the final combined render, your base layer
- Z-Depth: greyscale distance map, used for atmospheric haze and depth-of-field blur
- Ambient occlusion (AO): contact shadow detail, multiplied back in to deepen corners and grounding
- Reflection/specular: isolates shine and highlights for independent adjustment
- Material ID or cryptomatte: colour-coded masks that let you select every instance of glass, timber, or render one click
- Lighting/GI pass: separates bounced light from direct light for independent grading
- Emissive pass: isolates light fittings and screens so they can be pushed without blowing out the rest of the frame
- Alpha: clean cutout for compositing onto photographic backgrounds
Save these as a layered EXR where your render engine supports it, since EXR holds linear colour and high bit depth without banding when you push grades hard. If your pipeline is Photoshop-native, converting passes into Smart Objects preserves the same non-destructive flexibility and keeps every adjustment reversible. Z-Depth, AO, and Material ID passes are the three that do the heaviest lifting for precise, non-destructive edits, because they let you isolate exactly what needs changing rather than masking by hand.
Pro Tip: Name your pass layers consistently across every project (AO, ZDEPTH, MATID, SPEC) and build a Photoshop action that stacks them into blend modes automatically. It turns a 10 minute setup into a 30 second one.
How do you build a repeatable Photoshop post production workflow?
This is a sequence applied across residential, commercial, and planning deliverables, in this order, every time.
- Camera Raw first. Open the beauty pass through Camera Raw and correct exposure and white balance before anything else. Convert it to a Smart Object so every later adjustment stays editable.
- Base contrast with Curves. Apply a gentle S-curve for depth, then build luminosity masks to lift window exposure and control blown highlights without a global adjustment flattening the rest of the image.
- Composite the utility passes. Multiply in AO at low opacity to deepen shadow corners. Screen or blend in reflection/specular passes with masks. Use Material ID to select a single material (say, all glazing) and grade it in isolation.
- Colour grade. A Gradient Map for overall tone, Curves adjusted per channel for warmth or coolness, and Camera Raw’s colour wheels for split toning. Keep your LUT in a toggleable adjustment group so you can switch project looks without rebuilding the stack.
- Depth and atmosphere. Feed the Z-Depth pass into a Lens Blur mask for realistic depth-of-field, and use it again to add aerial haze that recedes with distance.
- Cleanup and entourage. This is where generative fill earns its place, extending backgrounds or filling gaps that don’t touch structural elements, and where a targeted AI edit can add or refine people without a full re-render. Always check scale and perspective against the vanishing points already in the shot.
- Finalise. Apply output sharpening only to the merged, exported layer, never to the working file. Export your client and web variants, and keep the full layered PSD as your master for revisions.
That layered PSD master approach is what makes revision requests painless. Instead of rebuilding a shot from scratch when a client asks for a different sky or a warmer grade, you reopen the master and adjust one group.
Where AI genuinely helps, and where it doesn’t
AI tools now do three jobs well in an archviz pipeline: precision edits that touch only a selected region, generative fill for non-structural background work, and dedicated upscaling for final resolution.
Precision-edit tools change only the area you select, leaving the surrounding lighting, perspective, and composition untouched, which means you can refine a single window or material without triggering a full re-render, according to Gendo’s documentation on precision editing. That’s a genuinely different workflow from masking everything by hand, and it removes a chunk of the technical skill barrier from small fixes.
For final resolution and material refinement, archviz-tuned upscalers such as vaethat’s render enhancer are built specifically to preserve geometry and material accuracy rather than inventing texture the way a generic photo upscaler might. Tools like Vibe3D’s enhancer claim broad engine compatibility across Enscape, Lumion, V-Ray, and D5, which is useful if your studio pulls renders from more than one source.
A few rules keep AI use studio-safe:
- Always compare before and after at full resolution, not thumbnail size.
- Limit generative changes to backgrounds, skies, and entourage. Never let AI redesign structural elements.
- Keep a layered backup before any generative pass, in case the client wants the untouched version.
- Mask loosely, describe the change in plain language, generate several options, and pick the strongest by eye rather than accepting the first result.
Pro Tip: Run generative fill on a duplicated layer, never the original beauty pass. If a client later asks for a different sky treatment, you still have the raw render to start again from.
Common post-production mistakes that flatten a good render
Most quality problems in finished archviz images trace back to a handful of repeatable errors, not bad renders.
- Over-grading a single image in isolation, producing a look that clashes with the rest of the project set once seen side by side.
- Skipping utility passes and trying to fix contact shadows or reflections with global Curves adjustments instead of masked, targeted ones.
- Letting an upscaler run unsupervised, which can invent material detail that wasn’t in the original design intent.
- Inconsistent LUTs across a project, so exterior daytime shots and interior evening shots look like they belong to different buildings.
The fix is largely procedural. Build reusable grade groups you can drop onto any project. Save Material ID selection presets so isolating brick or glazing takes seconds. Keep separate export presets for print and web so nobody manually resizes a file at 2am before a deadline. Run a short QA pass against a checklist before delivery, not after a client flags an issue.
One judgement call matters more than any Photoshop technique: if the problem is geometry, incorrect light direction, or a missing structural element, re-render it. No amount of post-production cleverness fixes a wall in the wrong place.
How a studio structures post-production for planning and marketing work
Standardisation is what separates a studio pipeline from a freelancer working image by image. A consistent approach applies the same pass structure, the same shared LUTs, and the same layered PSD master approach across every project, whether the end use is a marketing brochure or a formal planning submission.
That consistency matters more for planning-grade visuals than almost anywhere else, since planning committees and objectors scrutinise accuracy far more closely than a prospective buyer flicking through a brochure. A deliverable set built for planning keeps a documented, reversible edit history precisely because a planning officer might ask how a specific view was produced. Visual Trick provides custom CGI and architectural visualisation for property developers, architects, planning consultants, and estate agents across residential, commercial, and healthcare projects, with post-production built into the same pipeline rather than bolted on as an afterthought.
Colour grading rules that actually apply to architectural work
Architectural colour grading answers to a different brief than photographic or cinematic grading. The building has to read as real, buildable, and true to its specified materials, not just visually striking.
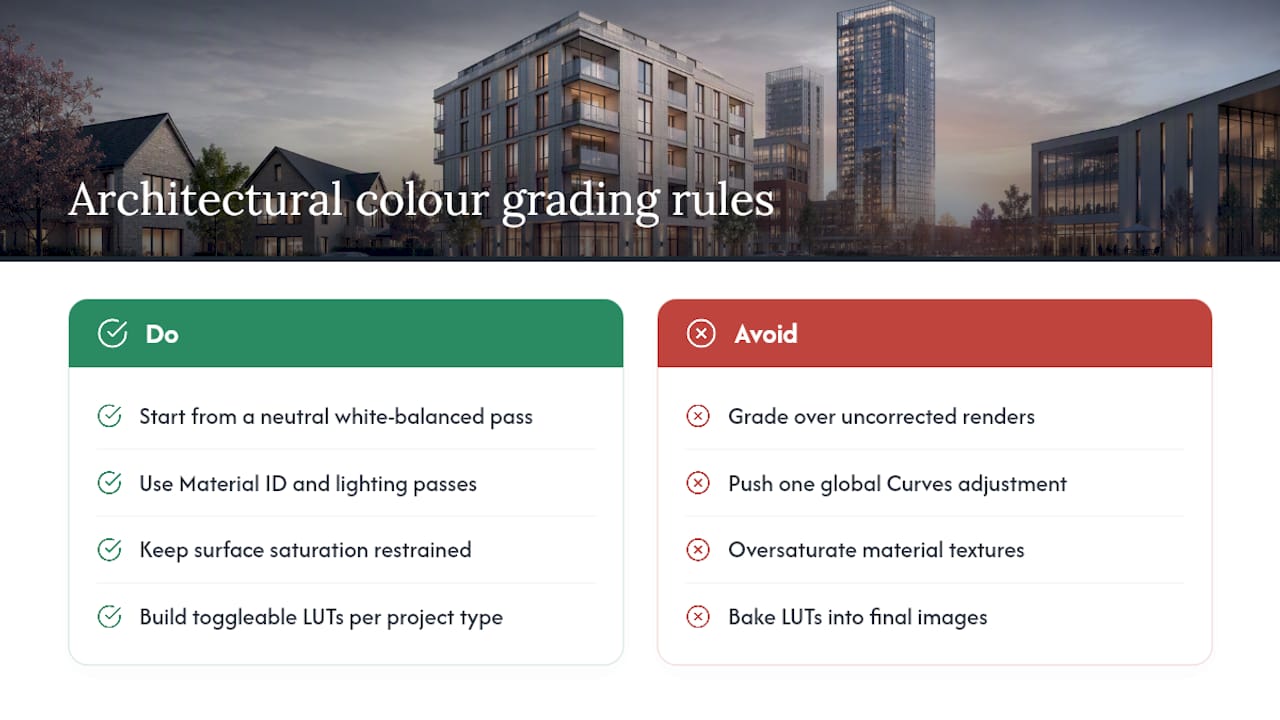
Start every grade from a neutral, correctly white-balanced beauty pass. Grading over an uncorrected render just compounds a colour cast rather than fixing it. From there, grade materials and light sources independently using your Material ID and lighting passes, rather than pushing one global Curves adjustment over the whole frame. A warm interior timber floor and a cool glass facade need different treatment, and grading them together usually muddies both.
Keep saturation restrained on architectural surfaces. Render materials like brick, render, and stone already carry colour information from their textures, and oversaturating them reads as artificial rather than premium. Push saturation instead into secondary elements: sky, foliage, and accent lighting, where a bit of drama helps sell the atmosphere without misrepresenting the building’s actual finishes.
Build one LUT per project type (daytime exterior, dusk exterior, interior) and apply it as a toggleable adjustment layer group rather than baking it in. This is what keeps a full image set looking like one coherent building rather than five disconnected renders, and it means a client-requested tone shift takes minutes rather than a full re-grade.
Finally, check your grade against a genuine white reference in the frame, a white wall, a pale worktop, whatever the scene contains. If white reads blue or amber after grading, you’ve drifted too far, and it will show on a calibrated monitor even if it looked fine on a laptop screen.
Blending 3D renders into photographic backgrounds
Compositing a render onto a photographic backdrop, common for infill developments or extensions shown against an existing streetscape, lives or dies on light direction and lens matching before any Photoshop work starts.
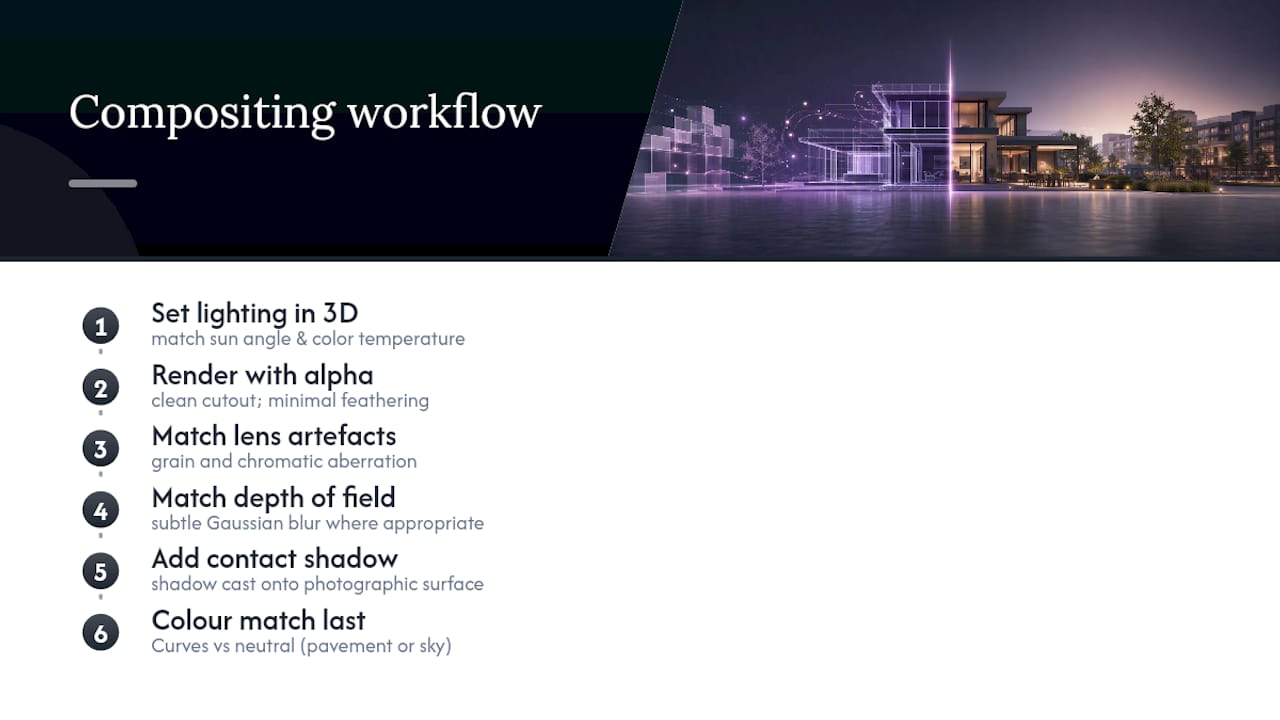
Match your render’s sun angle and colour temperature to the photograph at the render stage, not in post. Trying to relight a render after the fact to match a photograph’s raking evening light is far harder than setting the correct sun position in the 3D scene from the start. Once the render is close, use your alpha pass for a clean cutout and feather the edge minimally. A hard-edged cutout is the single most common tell that an image is composited.
Match grain and chromatic aberration if the photograph has any, since a perfectly clean CGI element sitting inside a photograph with natural lens characteristics reads instantly as fake to a trained eye, and increasingly to an untrained one too. Add a subtle Gaussian blur matched to the photograph’s depth of field if your CGI element sits at a distance where the camera would naturally soften detail.
Ground the building with a contact shadow cast onto the photographic surface, not just the render’s own shadow pass. This is often the single detail that convinces a viewer the object belongs in the scene rather than floating above it. Colour-match the render to the photograph last, using a Curves adjustment referenced against a neutral element common to both, like a pavement or a grey sky.
Batch processing multiple renders without losing quality
A single-image workflow does not scale to a 40-image marketing set on a tight deadline. Batching well means separating what has to stay manual from what can run automatically.
Build your grading group, your LUT, your sharpening action, and your export presets once, on your strongest hero image, then apply that same adjustment stack as a starting point across the rest of the set via Photoshop actions or a droplet.
Keep your file naming and pass exports identical across every image in a batch so your action doesn’t break on a mismatched layer name. Process similar shot types together, all daytime exteriors in one pass, all interiors in another, since lighting conditions cluster and one grade adjustment tends to suit the whole group with only minor per-image tweaks. Review the full batch side by side at the end, at thumbnail size, before final export. Inconsistency between images in a set is far easier to spot zoomed out than one at a time.
Export settings for client presentations and portfolios
The final export decision depends entirely on where the image is going next, and treating every deliverable the same way is a common, avoidable mistake.
For client presentation decks and PDFs, export as high-quality JPEG at 100% quality, sRGB colour space, sized to the actual display resolution needed rather than the render’s native size. A 15,000 pixel wide TIFF in a PDF just bloats file size without adding visible quality on screen or in most print.
For planning application submissions, check the specific local authority’s file format and resolution requirements before export, since these vary and some councils specify minimum DPI for printed submissions. Keep an uncompressed TIFF or high-quality PNG master for anything that might be printed at large scale, since JPEG compression artefacts become visible on a poster-sized print in a way they never would on screen.
For a portfolio or website, export at web-optimised resolution (typically 2000 to 2500 pixels on the long edge) with moderate compression, since page load speed affects how long a visitor actually looks at your work. Always retain the full-resolution layered PSD master regardless of what gets exported. A client revision request six months later is far easier to handle from a master file than from a flattened export.
The workflow discipline that actually separates good archviz studios
The gap between an amateur post-production pass and a studio one is rarely about talent with Curves or a cleverer LUT. It’s about discipline: exporting the full pass set every time, even when a shot looks fine without it, and building a repeatable sequence rather than improvising fresh for every image.
Conventional advice on this topic leans hard on software features, learn this filter, try that plugin, without addressing the actual bottleneck, which is inconsistency across a project set. A client rarely notices that one image is beautifully graded. They notice immediately when five images in the same set look like they came from different buildings.
AI tools are genuinely useful here, but only when treated as a precision instrument rather than a shortcut around craft. Embedded features in Photoshop now handle sky replacement and simple cleanup convincingly, but pass compositing and colour grading remain deliberate, human decisions that a prompt cannot make for you. Prioritise the pass export discipline and the reusable grade structure first. Everything else, including which AI tool you reach for, is secondary to having that foundation in place.
— Paride
Need a studio to handle this end to end?
Running a full pass export and Photoshop pipeline on every image takes real time, and if you’re an architect, developer, or agent under deadline pressure rather than a full-time retoucher, that time is usually better spent elsewhere. Some studios handle the entire process in house, from render through to planning-ready or marketing-ready final image, using exactly the pass-based workflow described above.

Hiring a studio makes the most sense when you need volume (a full marketing set rather than one hero shot), when the output has to hold up to planning committee scrutiny, or when your deadline doesn’t leave room to build a pass compositing pipeline from scratch. Visual Trick delivers architectural visualisation for developers and architects, CGI built specifically for planning applications, and dedicated CGI for interior designers needing consistent, presentation-ready imagery across a whole scheme. If you have renders that need this level of finish and not the hours to spend on it, consider contacting a studio to discuss your project and deadline for a scoped, fully post-produced deliverable set.
Sources
FAQ
Is archviz post-production in demand?
Yes. As property marketing and planning submissions rely increasingly on photorealistic visuals, studios that combine strong rendering with a disciplined post-production pipeline are in steady demand across residential, commercial, and healthcare development.
How much do archviz artists make?
Earnings vary widely by region, experience, and whether the artist works freelance or within a studio, and no single reliable figure applies across the whole industry, so it’s worth researching rates specific to your market and specialism directly.
Is Unreal Engine good for archviz?
Unreal Engine is strong for real time walkthroughs and interactive visualisation, but most studios still export stills through a renderer like V-Ray or Corona and finish them in Photoshop for the level of grading and pass control a static client deliverable needs.
What is the best software for architectural rendering?
There’s no single best renderer. The choice depends on your 3D package and pipeline, but whichever engine you use, Adobe Photoshop remains the standard for the post-production stage where mood, grading, and final presentation come together.
Do I need AI tools to do archviz post-production well?
No. AI speeds up specific tasks like upscaling and background cleanup, but the core workflow, exposure, pass compositing, and colour grading, works entirely without it and remains the foundation any AI tool builds on top of.
