
For final marketing stills, the Revit to 3ds Max plus V-Ray pipeline still wins on image quality and material control. For fast design reviews and animated walkthroughs, a Direct Link into D5 Render or Twinmotion beats it on speed. Most studios end up running both: 3ds Max for the hero shots, a real-time engine for everything else. FBX exports remain the fallback when Direct Link plugins misbehave or a client needs a self-contained file.
TL;DR:
- Using Revit to 3ds Max and V-Ray provides the highest material realism for print-quality images, but it is slower than real-time options.
- Preparing and cleaning the Revit model before export—such as purging unused families and standardizing naming—significantly reduces import issues and rework.
- FBX exports are ideal for final handovers and cross-platform use, while Direct Link is better for live iteration during design development.
- Keeping scene setup consistent post-import, including units and material mappings, prevents scale and UV issues during rendering.
- Automating repetitive tasks with Dynamo and scripts can shave hours off project prep but cannot replace experienced judgment for lighting and composition.
Table of Contents
- Choosing the right Revit to CGI workflow for your deliverable
- Prepare and clean the Revit model before export
- Export options: Direct Link, FBX or RVT link?
- Setting up your scene after import
- Rebuilding materials: from Revit IDs to PBR realism
- Lighting, camera work and render settings that hold up
- Speeding up iteration without wrecking quality
- Animation, baking and getting a clean final output
- Troubleshooting checklist: fast fixes for common errors
- A handover checklist for a clean CGI pipeline
- Best practices for managing linked Revit models and worksets
- Handling parametric families and BIM data in CGI software
- GPU versus CPU rendering: which fits your Revit pipeline
- Automating the Revit to CGI pipeline with scripts and Dynamo
- Version control and team collaboration on multidisciplinary projects
- What most Revit to CGI advice gets wrong
- Outsourcing the Revit to CGI workflow to Visual Trick
- Sources
- FAQ
Choosing the right Revit to CGI workflow for your deliverable
The route you pick should follow the deliverable, not the software licence sitting on your desk. Four pipelines cover almost every brief a UK visualisation studio takes on, and each one trades speed against control in a different way.
- Revit to 3ds Max + V-Ray: the slowest setup but the highest ceiling for material realism, lighting control and print resolution. Best for planning submissions, hero marketing stills and anything going to print.
- Revit to D5 Render (Direct Link): near-instant syncing, GPU-accelerated real-time preview, and genuinely fast turnaround on animation. Best for client walkthroughs, internal design reviews and social content.
- Revit to Twinmotion (Direct Link): similar real-time strengths to D5, with a slightly different asset library and a workflow many architects already know from Unreal Engine roots. Best for early-stage design communication and rapid what-if scenarios.
- Revit native rendering: fine for quick internal checks but not built for client-facing imagery, since it lacks the material and lighting depth dedicated engines offer, as the Tripo3D rendering guide notes.
If you’re producing one flagship image for a planning committee, go 3ds Max and V-Ray. If you’re iterating through five design options with a client on a call, Direct Link to D5 Render or Twinmotion saves hours you’d otherwise burn on re-exports.
Prepare and clean the Revit model before export
Every export problem you’ll troubleshoot later starts here. A bloated, badly named Revit file causes broken materials, invisible geometry, and hours of rework in 3ds Max or D5 Render that a clean export would have avoided entirely.
- Set up a dedicated 3D view for export. Don’t export from a working view cluttered with grids, dimensions and section boxes. Autodesk’s own guidance recommends building a clean 3D view specifically for export, with a scope box isolating exactly what needs to travel downstream, as detailed in Autodesk’s Revit to 3ds Max documentation.
- Purge unused families and simplify over-detailed parametrics. Stair nosings, bolt patterns, and internal blocking rarely read in a rendered shot but cost real processing time on export and import.
- Replace RPCs and heavy entourage before you export. RPC trees, people and cars from Revit frequently import as broken or invisible geometry in other renderers, so swap them for render-ready proxies first, per ArchVision’s own RPC documentation.
- Standardise naming and shared coordinates. If linked models are involved, confirm shared coordinates match across files and name views, worksets and components consistently so nothing gets lost in translation.
- Check units, levels and phases before hitting export. A wrong phase filter is the single most common reason half a building vanishes on import.
Cleaning the model this way, removing unnecessary detail and setting proper view states, measurably improves downstream performance and reduces import failures, according to strand.co’s Revit to rendering workflow guide.
Pro Tip: Save your export-ready 3D view as a named view state and reuse it for every revision. It turns a five-minute prep job into a two-click habit.
Export options: Direct Link, FBX or RVT link?
Three export routes cover practically every Revit to CGI workflow, and picking the wrong one wastes more time than any other step in the pipeline.
Direct Link (D5 Render and Twinmotion) keeps Revit and the renderer connected, syncing geometry changes in real time so edits in Revit appear almost instantly on the render side, a real advantage for Twinmotion’s Direct Link workflow. Use it whenever you’re iterating live with a design team or client, and you want to avoid re-exporting after every tweak.
FBX export remains the workhorse for final handovers and cross-platform work. Autodesk documents that Revit exports geometry to FBX cleanly when you work from a proper 3D view, with control over hierarchy structure, triangulation, and unit scale on the way out. FBX beats a live link whenever you need a self-contained, version-locked file, say, for archiving a specific design stage or sending assets to a freelance render artist who doesn’t have Revit installed.
RVT link or direct RVT import into 3ds Max preserves more of the underlying BIM data than FBX does, including some parameter information, which matters if downstream teams need to query the model rather than just render it. Link rather than import when the Revit file is still being actively updated by the architectural team, so your 3ds Max scene stays current without repeated manual re-exports.
- Direct Link: best for daily iteration, weakest for archiving a fixed version.
- FBX: best for final handover and cross-platform compatibility, weakest for live collaboration.
- RVT link: best when BIM data needs to survive the trip, weakest when file sizes balloon on complex projects.
Direct links suit iterative design reviews, but FBX exports still earn their place for final presentations where cross-platform stability matters more than live sync, a distinction worth keeping in your team’s workflow documentation.
Setting up your scene after import
Getting geometry into 3ds Max, D5 Render or Twinmotion is only half the job. What happens in the first twenty minutes after import determines whether your afternoon goes smoothly or becomes a debugging session.
In 3ds Max, confirm system units match Revit’s output before anything else. Community and Autodesk guidance both flag unit mismatches as the leading cause of scale problems on import, so check this before you touch a single material. Group imported geometry logically, then swap heavy parametric families for optimised mesh versions ready for V-Ray, especially on anything that will sit close to camera.
In D5 Render and Twinmotion, Direct Link handles most of the heavy lifting, but check your camera pass imported correctly and that the environment defaults (sky, sun position, ambient occlusion) haven’t reset to a generic preset. Both platforms ship reasonable default asset libraries. Build a habit of swapping generic vegetation and furniture for your own curated library early, before lookdev, not after.
Common fixes worth knowing before you panic:
- Flipped normals show up as dark or transparent faces. A normal-flip tool in either 3ds Max or the target renderer usually solves it in seconds.
- Scale issues almost always trace back to a units mismatch between Revit and the target application.
- Missing geometry is often a phase filter or view range problem back in Revit, not a corrupted export.
- UV problems on curved or swept geometry frequently need a manual UV unwrap pass, since Revit’s automatic mapping wasn’t built for photoreal texturing.
Rebuilding materials: from Revit IDs to PBR realism
Revit materials are built for design communication, not photoreal rendering. They carry basic colour and pattern information but lack the roughness, metalness and normal map data that physically-based rendering, or PBR, actually needs to look convincing under real lighting.
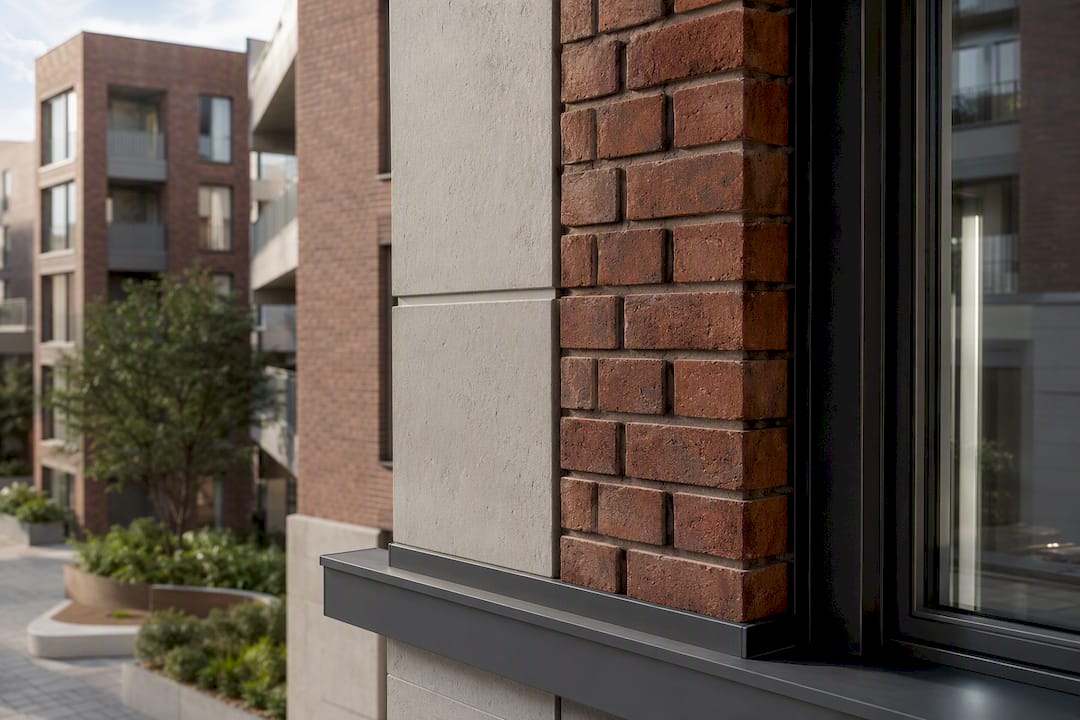
The fix is a consistent renaming and remapping pass. Export with Revit material names intact, then build a lookup so “Brick_Facing_Red” in Revit maps directly to a specific PBR brick asset in your library every single time, not a different one picked ad hoc on each project. This single habit is what separates studios that spend hours reassigning materials from ones that spend minutes.
Texture resolution should match camera distance: 4K maps on a hero facade close to camera, 1K or 2K on background buildings that will never fill more than a few pixels. Watch memory budgets on large masterplan scenes, where dozens of high-resolution textures can choke a GPU faster than polygon count ever will. UDIMs help on large, complex surfaces like curved feature walls where a single UV tile would stretch badly.
Pro Tip: Build one master material library shared across your whole studio, not one per project. A well-structured, consistently named library drastically cuts material reassignment time on every new job, since nobody’s hunting for “that concrete texture from the Bristol job” again.
Lighting, camera work and render settings that hold up
Lighting and camera choices matter more than render engine settings for how convincing an architectural image feels. Get the light direction and camera height wrong and no amount of denoising fixes it.
- Bring Revit’s sun position across accurately. Match date, time and location settings between Revit and your renderer so shadow angles stay geographically honest, especially important for planning submissions where shadow studies get scrutinised.
- Use IES light profiles for interiors. Generic point lights flatten interior scenes; real IES data from actual fixture manufacturers gives you believable falloff and pooling.
- Choose an HDRI that matches your target sky condition for exteriors. An overcast HDRI under a clear-sky sun setting looks wrong immediately, even to non-technical viewers.
- Frame with a real lens in mind. A 24 to 35mm equivalent reads as natural for exterior architecture; anything wider starts distorting verticals unless you’re deliberately going for a dramatic angle.
- Keep depth of field subtle. Heavy bokeh reads as a toy-town miniature effect on buildings; architectural photography rarely uses shallow depth of field for a reason.
- Lock render settings across a sequence. Exposure, white balance and sampling need to match frame to frame in an animation, or you’ll get visible flicker in the final edit.
Speeding up iteration without wrecking quality
Render times kill deadlines faster than any other single bottleneck in a Revit to CGI workflow. A handful of habits keep both offline renderers and real-time engines responsive.
- Use proxies and instances for repeated assets like trees, chairs, and railings rather than unique geometry for every copy.
- Simplify geometry outside the camera frustum, distant buildings rarely need architectural detail beyond a rough massing block.
- Work at lower texture resolution during lookdev and material testing, then swap to full resolution only for the final pass.
- Use crop renders and region renders to test a single problematic area rather than re-rendering the whole frame every time.
- On UK studio budgets, a mid-range GPU with more VRAM usually outperforms a marginally faster GPU with less, since texture-heavy architectural scenes are often memory-bound before they’re compute-bound.
Animation, baking and getting a clean final output
Whether you animate inside D5 Render or Twinmotion directly, or build your camera path in 3ds Max and bake it out, depends on how much control you need over the exact camera timing versus how fast you need a result.
- Animate inside the renderer for speed. D5 Render and Twinmotion both handle camera paths natively and render in near real time, ideal for client walkthroughs on a tight turnaround.
- Bake complex simulations before export. Cloth, particle effects and procedural materials should be baked to a fixed cache, using Alembic or FBX, before they leave 3ds Max, ensuring every frame renders identically regardless of which machine processes it.
- Lock your frame rate early. 25fps or 30fps for UK broadcast and web delivery, decided before animation starts, not adjusted afterwards.
- Name sequence files with a consistent version tag. “Scheme_A_v03_frame_0042” beats a folder of identically named PNGs when three people are reviewing footage simultaneously.
- Grade and composite as a final pass. A short colour grade and light compositing (sky replacement, minor cleanup) in a dedicated tool tends to lift a render more than another hour of raw render settings tweaking ever will.
Troubleshooting checklist: fast fixes for common errors
Most Revit to CGI problems fall into three buckets, and each has a quick diagnostic path before you waste time re-exporting from scratch.
- Missing geometry: check the Revit phase filter and view range first; it’s rarely a corrupted export.
- Broken or invisible materials: verify texture file paths haven’t broken on transfer, then reassign from your material library rather than manually rebuilding each one.
- RPC entourage vanishing or appearing as black boxes: replace with proxies before export rather than troubleshooting after the fact.
- Scale or orientation looking wrong: confirm system units match between Revit and the target application before touching anything else.
- Slow real-time preview in D5 or Twinmotion: check for accidentally imported high-poly parametric families that should have been simplified in Revit first.
A handover checklist for a clean CGI pipeline
Many studios find that most delays trace back to a handful of missing items at handover, not the rendering itself. A tight handover pack means the render begins the same day the file arrives, rather than a day later once someone’s chased down a missing texture.
A workable handover includes:
- A dedicated 3D export view, named clearly, with the scope box already set.
- All linked Revit files, with worksets clearly labelled and shared coordinates confirmed.
- A material schedule listing every Revit material name against its intended finish.
- Reference photography or mood boards where the client has a specific material or lighting look in mind.
- Confirmation of expected level of detail, since a planning submission needs different LOD to a hero marketing shot.
For deliverable specs, marketing stills typically go out at print resolution (300dpi at final print size) as TIFF or high-quality JPEG, while planning application images tend to follow the resolution and format the local planning authority specifies. Studios delivering architectural visualisation services that cover both markets usually keep separate export presets for each, since a planning committee and a marketing brochure have genuinely different technical requirements.
Best practices for managing linked Revit models and worksets
Multi-discipline projects almost always involve linked models, architectural, structural, MEP, sometimes landscape, each maintained by a different team. Getting the CGI pipeline to cope with that without breaking on every update takes some discipline.
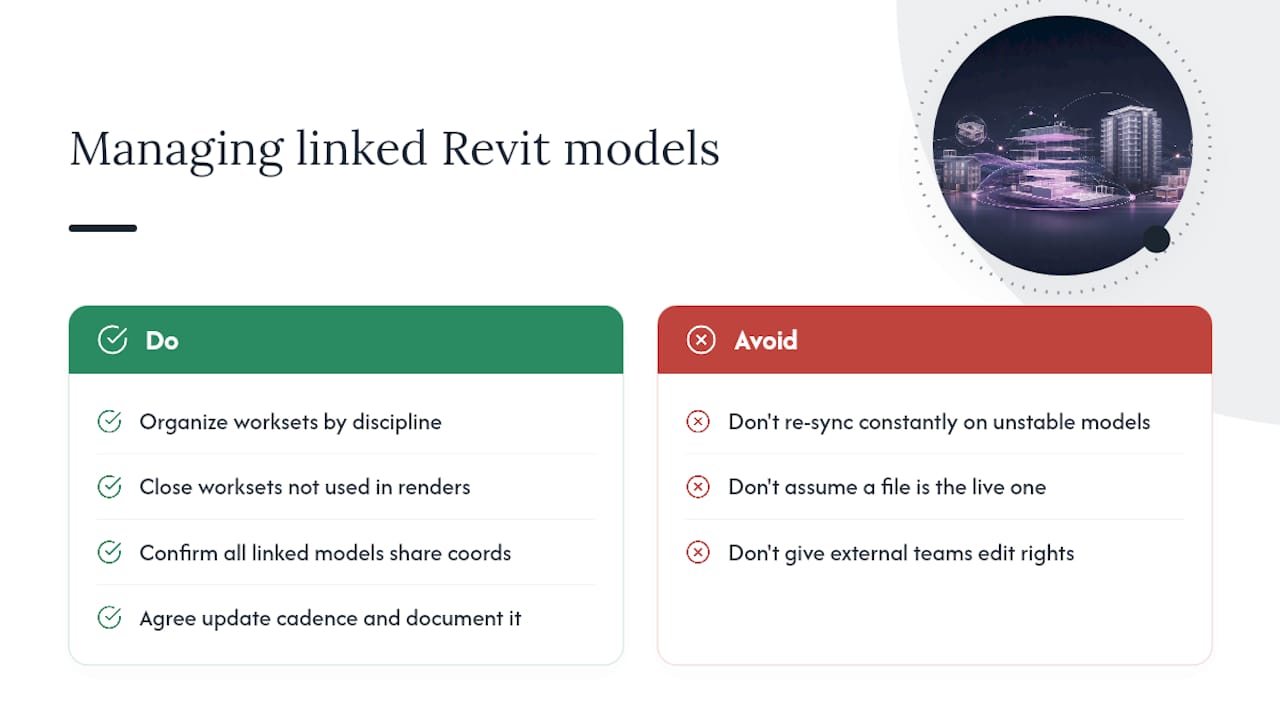
Keep worksets organised by discipline and by visibility relevance to rendering. A workset full of MEP ductwork that will never appear in a rendered shot should stay closed by default in your export view, cutting file size and export time without any loss of visual fidelity. Confirm every linked model shares the same coordinate system; a structural model offset by even a small margin from the architectural model causes visible misalignment once everything lands in 3ds Max or D5 Render.
Agree an update cadence with the design team before the project starts. If the architectural model updates weekly, decide whether your renderer needs a fresh Direct Link sync every time or whether a milestone-based FBX export better suits your deadline. Constant re-syncing on a fast-moving model can waste more time than it saves if the design isn’t yet stable enough to justify a full relight.
Where a linked model belongs to a consultant outside your studio, request read-only access rather than editing rights, and always confirm which file is the “live” version before starting a render pass. Nothing wastes a weekend faster than rendering from a structural model that got superseded three days earlier. Documenting this agreement once, at kickoff, saves repeated confusion on every subsequent revision cycle.
Handling parametric families and BIM data in CGI software
Parametric families are Revit’s greatest strength and, ironically, one of the biggest headaches once a model crosses into a rendering pipeline that doesn’t understand parametric logic at all.
Most CGI software, 3ds Max included, converts parametric geometry into static mesh on import, which means any parameter-driven change back in Revit requires a full re-export rather than a simple tweak. For elements that are effectively fixed for the render (a completed facade, a finished staircase), this is fine. For elements still in design flux, it’s worth keeping the parametric intelligence live via Direct Link or RVT linking for as long as possible, only converting to static geometry once the design is genuinely locked.
BIM parameter data, room names, material specifications, area schedules, rarely survives an FBX export intact, though some of it can persist through an RVT link into 3ds Max. If a downstream team needs to query that data (a facilities team checking room areas from the visualisation model, for instance), plan for that need before export rather than trying to recover lost parameter data afterwards. In practice, most CGI studios strip BIM data deliberately once it’s served its purpose, since carrying redundant metadata through a render pipeline adds file weight without adding visual value. Decide early which data genuinely needs to travel with the geometry and which can be dropped at the door.
GPU versus CPU rendering: which fits your Revit pipeline
The render engine you choose downstream shapes your entire workflow’s rhythm, not just its final image quality.
CPU-based engines like traditional V-Ray configurations still deliver the finest control over complex lighting scenarios and remain the standard for very high-resolution print output, though they render considerably slower than GPU alternatives on identical scenes. GPU-based engines, including V-Ray GPU mode, D5 Render and Twinmotion, render dramatically faster, which is precisely why real-time and near-real-time tools have taken over the iterative design-review stage of most Revit to CGI workflows.
The practical trade-off: GPU rendering is memory-bound rather than time-bound. A scene with dozens of 4K textures and dense proxy vegetation can choke a GPU’s VRAM long before it would trouble a CPU render farm working through RAM instead. This is exactly why the optimisation habits covered earlier, proxies, instancing, sensible texture resolution, matter more in a GPU-driven pipeline than they ever did in a purely CPU-based one.
Cloud rendering and dedicated render nodes offer a middle path when local hardware can’t keep pace with a deadline, letting studios burst capacity for a final animation or a large batch of stills without buying permanent hardware. For UK studios juggling multiple concurrent projects, a hybrid approach, GPU-based real-time tools for client-facing iteration, CPU or cloud-rendered V-Ray for the final hero stills, tends to cover both speed and quality without compromising either.
Automating the Revit to CGI pipeline with scripts and Dynamo
Manual repetition is the enemy of a fast Revit to CGI workflow, and this is where scripting earns its place even on modest-sized studios.
Dynamo, Revit’s built-in visual programming tool, handles a surprising amount of pre-export cleanup automatically: batch-renaming views, purging unused families across dozens of linked files, or auto-generating export view states for every level in a tall building. A studio processing the same type of project repeatedly (residential blocks, retail units) can build a Dynamo script once and reuse it on every new commission, cutting a half-day of manual prep down to minutes.
Python scripting, whether through 3ds Max’s own scripting console or standalone tools, handles the downstream half: batch material reassignment based on naming conventions, automated proxy substitution for entourage, or bulk texture resolution adjustment across a scene with hundreds of assets. Studios running high volumes of similar architectural typologies get the most value here, since the scripting investment pays for itself only after repeated use.
Realistically, full end-to-end automation from Revit to final render remains rare in production archviz, most projects still need a human eye on lighting, framing and material choices that scripts can’t judge. The genuine wins sit in the repetitive middle stages: file prep, naming, batch reassignment. Treat automation as a way to buy back hours on the boring parts, not a replacement for the creative judgement that makes a render actually convincing.
Version control and team collaboration on multidisciplinary projects
A Revit to CGI pipeline touches architects, structural engineers, render artists and often external consultants, and version confusion is the single most common way a studio ends up rendering the wrong design.
Agree a single source of truth for the Revit model before work starts, usually the architectural team’s live file, with everyone else working from linked or exported snapshots tied to a specific date or milestone. Name every export with a version number and date, never just “final” (there is always a second “final”). A simple shared spreadsheet or project management tool tracking which Revit version fed which render batch prevents the awkward conversation where a client approves a render of a design that changed two weeks ago.
Cloud storage with proper access permissions matters more than any specific software choice. Structural and MEP consultants rarely need write access to the CGI team’s 3ds Max scene files, but they do need visibility into which milestone the render team is currently working from, so a shared status document or simple naming convention across teams saves real confusion.
For animation projects especially, lock the camera path and timing before multiple people start touching the same scene file, since simultaneous edits to a shared animation are one of the fastest ways to lose a day’s work to a corrupted file or overwritten version.
What most Revit to CGI advice gets wrong
Most guides treat this as a single linear pipeline: export, import, render, done. That framing misses the reality that a professional studio runs at least two parallel workflows on every project, a fast real-time loop for client sign-off and a slower, higher-fidelity loop for the actual deliverable. Optimising only for one leaves you either too slow for design reviews or too rough for final marketing stills.
The conventional advice also underweights model preparation. Plenty of tutorials jump straight to export settings and render engine comparisons, treating Revit cleanup as a footnote. In practice, a poorly purged model with RPCs and unnamed worksets causes more lost hours than any render engine choice ever will. The teams that ship consistently aren’t the ones with the fanciest GPU, they’re the ones with a boring, repeatable prep checklist nobody skips under deadline pressure.
If there’s one priority worth fixing first, it’s this: build your export view and material naming convention before you touch a renderer at all. Everything downstream, Direct Link syncing, PBR mapping, lighting, gets faster and more predictable once that foundation is solid.
— Paride
Outsourcing the Revit to CGI workflow to Visual Trick
Not every studio has the time, hardware or in-house V-Ray expertise to run this pipeline on every project, and that’s exactly the gap Visual Trick fills for architects, developers and planning consultants who need reliable, planning-ready imagery without building an internal render team.

A professional CGI studio can take your Revit handover, cleaned views, linked worksets, material schedule, and run it through a production pipeline built specifically for CGI that has to hold up under planning committee scrutiny and client marketing standards alike. That’s the practical difference: you get a studio that’s already solved the RPC, unit-mismatch and material-remapping problems covered above, rather than absorbing that learning curve on a live deadline. Services span CGI for architects needing planning-ready stills, CGI for interior designers working on show-home visuals, and full architectural visualisation projects covering exterior, interior and masterplan imagery in one commission.
If your team is spending more time troubleshooting exports than designing, consider outsourcing the render pipeline handling with a clear file handover checklist and defined approval stages from the first draft to final delivery.
Sources
For plugin installs and export specifics, Autodesk’s own Revit to 3ds Max export documentation covers FBX and RVT import options directly. For Direct Link setup, see Twinmotion’s Revit workflow guide and D5 Render’s Revit to animation workflow. For broader interoperability background, AMV’s BIM and 3ds Max tutorial content is a useful supplementary read.
- Exporting from Revit to Twinmotion: a complete guide
- Exporting from Revit Architecture to 3ds Max (Autodesk Knowledge)
- From Revit model to cinematic 3D rendering workflow
FAQ
Is there an AI render tool for Revit?
D5 Render includes AI-assisted post-processing and real-time editing tools that speed up visualisation and animation tasks directly from a Revit-linked scene, though it works alongside traditional lighting and material setup rather than replacing it entirely.
Can I learn Revit in two days?
You can learn basic navigation and modelling in Revit within two days, but preparing a model correctly for a CGI export, clean views, purged families, proper phasing, takes considerably longer to master through repeated practice.
How do I convert a Revit file to FBX?
Set up a dedicated 3D view with a scope box, then use Revit’s export function to output FBX geometry, checking hierarchy, unit scale and triangulation settings before the export completes, as outlined in Autodesk’s own documentation.
Can AI make Revit models from scratch?
Current AI tools mostly assist within existing Revit workflows, generating design options or automating repetitive tasks via Dynamo, rather than producing a fully finished, code-compliant Revit model unassisted.
Should I use Direct Link or FBX for my final deliverable?
Use Direct Link for iterative design reviews where the model keeps changing, and switch to a locked FBX export once the design is finalised and you need a stable, version-controlled file for final rendering.
