
CGI is the fastest, most reliable way to present and compare realistic design alternatives so stakeholders can choose with confidence. Real-time engines let teams iterate through layouts in minutes, interactive configurators let clients toggle materials on demand, and specialists turn CAD or BIM data into option sets that stand up to scrutiny. What follows covers the workflow, tools, costs, and comparison rules that make CGI decisions defensible rather than guesswork.
TL;DR:
- Consistent camera angles, lighting, and timing are essential to ensure fair comparison of CGI options, especially for planning submissions and design decisions.
- Using a reusable model rather than rebuilding scenes for each variant maintains consistency and reduces costs, making side-by-side evaluations more reliable.
- Detailed briefs including source data, option matrices, and clear approval processes minimize revisions and scope creep, saving time and expense.
- Real-time engines are best suited for rapid exploration of multiple options, while offline renderers excel at final, high-fidelity marketing images.
- Proper cost estimation depends on model complexity, the number of variants, and whether interactivity or verified accuracy is required, with no fixed pricing for CGI.
Table of Contents
- How CGI helps you evaluate design options
- Which deliverables should you commission?
- What to supply for an efficient CGI brief
- Real-time engines, renderers, and configurators: what each one is for
- What drives CGI cost and turnaround
- How do you compare design options fairly?
- Practical evidence from professional visualisation practice
- Case studies: what effective option comparison actually looks like
- Common pitfalls when using CGI to compare design options
- How CGI fits alongside VR and physical models
- When should CGI stay simple, and when should it push for realism?
- How Visualtrick supports your option decisions
- Sources
- FAQ
How CGI helps you evaluate design options
CGI works because it lets you change one variable at a time from a single 3D model rather than rebuilding a scene from scratch. A material swap, a different window arrangement, a repositioned kitchen island: each becomes a fresh render pulled from the same underlying geometry, which is what makes side-by-side judgement possible in the first place.
CGI typically supports decisions on:
- Layout and spatial planning, including room configurations and circulation routes
- Materials, finishes, and colour schemes across facades or interiors
- Lighting conditions, from daylight studies to evening ambience
- Furniture and fixture positioning before anything is purchased
CGI can present alternative layouts, furniture positions, materials, colours, finishes, and lighting from the same 3D model , which means comparisons happen before any physical mock-up gets built. That timing matters more than it sounds: catching a bad material choice in a render costs nothing; catching it after installation costs a great deal.
Pro Tip: Ask your visualiser for the same camera angle across every option before the review meeting. Stakeholders judge the design, not the photography.
Which deliverables should you commission?
Different decisions call for different outputs, and picking the wrong one wastes both budget and time. A single still image answers a narrow question; a walkthrough answers a much broader one.
- Stills work for quick comparisons of a specific material, colour, or fixture across two or three options.
- 360° panoramas let a client “stand” inside a space and look around, useful for spatial sign-off before a full animation is justified.
- Animated walkthroughs suit marketing and investor pitches where the sequence and flow of a space matter as much as any single view.
- Interactive configurators let a client swap finishes or layouts live, which is the closest CGI gets to a genuine decision-support tool.
For anything feeding a planning application, a verified photomontage with documented methodology is the safer choice over a standard render, since planning officers need to trust the geometry, not just admire the image.
What to supply for an efficient CGI brief
A vague brief produces vague options, and vague options produce endless revision rounds. The ARB client checklist recommends nailing down aesthetics, use and lifestyle, space and location, timeframe, budget, and reference images before work starts, and the same logic applies almost exactly when briefing a CGI provider.
- Supply source CAD, BIM, or accurate survey data, and agree upfront how precise the model needs to be.
- Define an option matrix listing every variable, the allowed combinations, and who owns the final decision.
- Set a change control rule: one variable per revision round, not five at once.
- Agree review cycles and keep a written record of each approval, including the date and the approving stakeholder.
Following an ARB-style checklist at the brief stage tends to cut the number of “just try this too” requests that derail a schedule.
Pro Tip: Name your options plainly (“Option A: oak cladding,” not “Version 3 final”) so nobody approves the wrong render by accident.
Real-time engines, renderers, and configurators: what each one is for
Real-time engines and LiveSync-style workflows keep CAD or BIM models connected to the visualisation, so teams iterate without repeated exports. Lumion’s strength is speed: it updates renders quickly as the model changes, enabling smooth iteration. Twinmotion follows a similar logic, converting CAD or BIM data into stills, videos, and immersive experiences quickly while plugging into most common design packages.
- Real-time engines (Lumion, Twinmotion) suit rapid exploration across many options.
- Offline renderers suit final marketing stills where photographic fidelity outweighs speed.
- Interactive configurators (Spline-style pipelines) import CAD or 3D files, map the variables, and embed the result in a website or backend for live client interaction.
- Verified photomontages suit planning submissions where accuracy has to be demonstrable, not just plausible.
What drives CGI cost and turnaround
There’s no universal CGI price. What drives the number is complexity, view count, whether the client wants interactivity, how much accuracy the model needs, and how many revision rounds are included.
A properly structured quotation, aligned with the kind of terms an ARB engagement document would expect, separates:
- Base modelling from the source drawings
- Each option variant as its own line item
- Draft review rounds versus final delivery
- Rush fees for compressed schedules
- Licensing terms for how the images can be used
The trade-offs are predictable: push for more fidelity and turnaround stretches; push for more interactivity and setup cost rises; push for speed on a tight brief and you sacrifice detail. Providers such as Visualtrick, working in-house rather than outsourcing production, tend to hold turnaround more predictably because no stage depends on a third party’s schedule.
How do you compare design options fairly?
Comparison only works if the only thing changing between images is the design, not the photography. The fairest comparison keeps camera position, field of view, crop, time of day, and exposure consistent, because changes in those variables bias judgement just as much as a genuine design difference would.
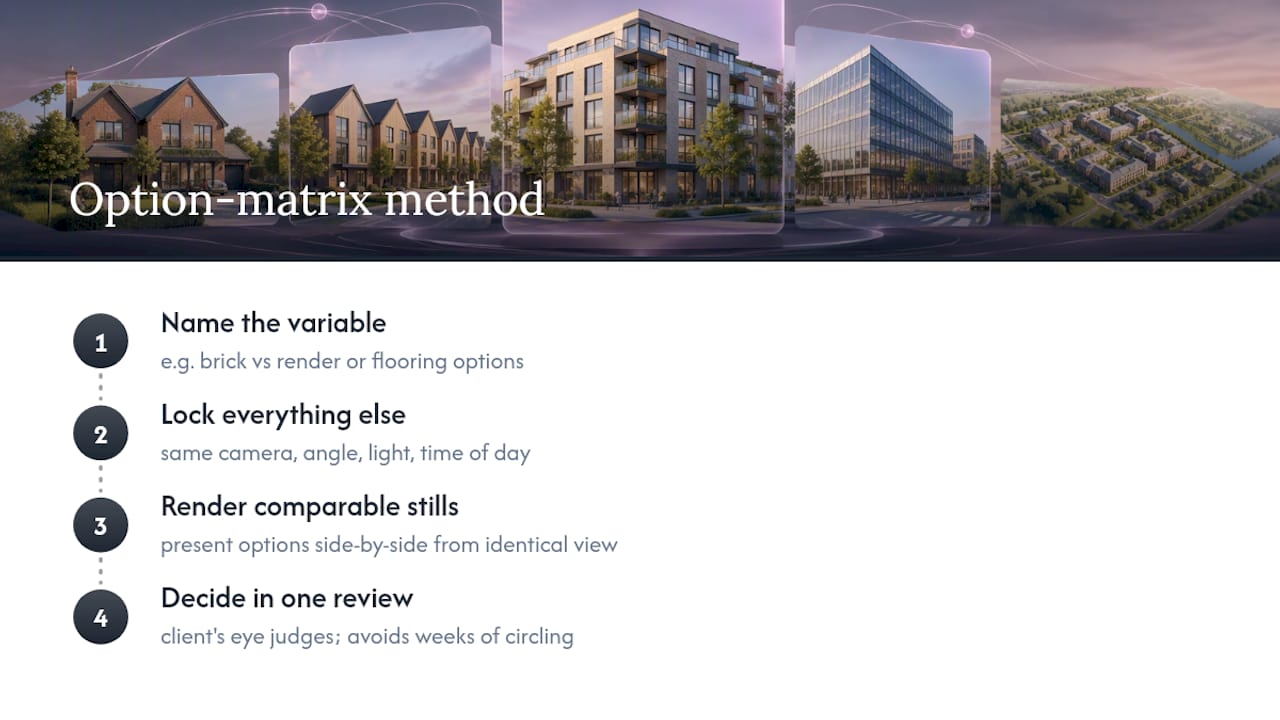
- Lock the camera, lens, lighting, and crop across every option in the set before rendering begins.
- Build an option matrix that changes one variable at a time, so any preference is traceable to a specific choice.
- For planning-facing imagery, request the technical methodology and source assumptions behind the model, including camera or lens data and survey accuracy.
- Treat the 3D model as the reusable asset and confirm ownership, update rights, and revision limits before approving anything.
Pro Tip: If two options look different in ways you can’t quite name, check the lighting timestamp first. It’s the most common accidental variable.
Practical evidence from professional visualisation practice
Providers built around in-house production tend to organise commissions more tightly, because one team controls the model from brief to final output rather than passing it between subcontractors. That matters most at the option-comparison stage, where consistency between renders is the entire point.
Some providers’ service ranges reflect this structure directly:
- Planning Visuals and Verified Views for submissions requiring documented methodology
- Interior CGI and Exterior CGI for material and finish comparisons
- 3D Animation and Virtual Tours for stakeholder walkthroughs
Working from a single reusable model rather than rebuilding scenes per option cuts the risk of one variant quietly drifting from the others in lighting or framing, which is exactly the inconsistency that undermines fair comparison.
Case studies: what effective option comparison actually looks like
The clearest examples of CGI earning its keep involve clients who didn’t know which option they preferred until they saw them side by side. For example, a care home developer weighing brick versus render facades gains almost nothing from a written description of either. Two consistent exterior stills, shot from the same angle in the same light, settle the question in a single meeting.
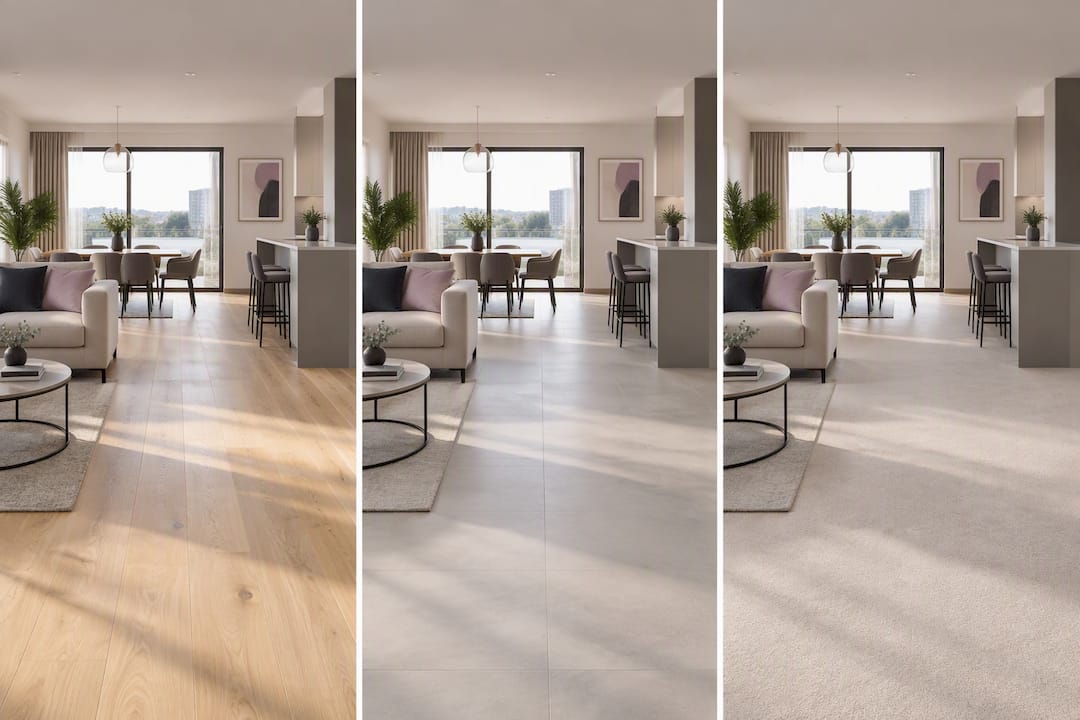
Interior fit-outs show the same pattern on a smaller scale. An interior designer choosing between three flooring options for a show apartment can present all three from the identical camera position, at the identical time of day, and let the client’s eye do the work rather than their imagination. That’s a meaningfully different exercise from handing over three sample tiles and asking someone to picture the room.
Marketing-led projects reveal a different use case: options aren’t always about choosing between finishes but about testing which version of a scheme photographs best for a brochure or investor pack. A property marketer comparing two landscaping schemes for a development’s hero shot isn’t deciding what to build. They’re deciding what sells. That distinction should shape the brief from the outset, because a marketing-optimised render and a planning-accurate one are not interchangeable outputs, even when they depict the same design.
What separates a useful case from a wasted one is almost always the discipline of the option matrix. Projects that name their variables and lock everything else tend to reach a decision in one review cycle. Projects that let five things change at once between renders tend to circle for weeks, because nobody can say with confidence what they’re actually reacting to.
Common pitfalls when using CGI to compare design options
The most common failure is comparing options that were never actually comparable. If one render uses midday sun and another uses an overcast afternoon, any preference expressed afterwards is partly a lighting judgement, not a design one. Locking camera and light settings before rendering avoids this entirely.
A second pitfall is scope creep disguised as exploration. A brief that starts with three options often ends with nine, because each review meeting spawns “just one more variant.” An option matrix with a named decision owner and an agreed approval date, following the terms-of-engagement approach ARB outlines, keeps that instinct in check.
A third pitfall shows up specifically in planning contexts: commissioning an attractive image instead of an accurate one. Planning officers and objectors scrutinise camera position, lens choice, and survey data, and an image without a stated methodology can be unsuitable for a planning decision even when it looks convincing. Ask for the assumptions behind the render, not just the render.
A fourth, quieter problem is treating each image as a one-off rather than working from a reusable model. Teams that rebuild geometry for every new option lose consistency between versions and pay for the same modelling work repeatedly. Keeping the model itself as the deliverable, with images as outputs from it, solves both problems at once and tends to reduce the timeline for producing additional variants later in a project.
Finally, some teams skip a written review record altogether, then argue later about which option was actually approved. A simple log, noting the date, the approving stakeholder, and the exact variant signed off, prevents that argument before it starts.
How CGI fits alongside VR and physical models
CGI rarely replaces other decision tools; it usually sharpens them. A physical model still communicates massing and scale in a way a screen cannot fully replicate, particularly for planning committees or elderly stakeholders less comfortable with digital formats. CGI complements that by supplying the material and lighting detail a physical model cannot show, especially in white or grey card form.
Virtual reality extends the same logic further. Once a model exists for CGI, that same geometry can often feed a VR walkthrough with comparatively little extra work, giving a client a sense of scale and proportion that a flat image can’t convey. This matters most for spatial decisions, like whether a ceiling height feels generous or a corridor feels cramped, where two-dimensional renders sometimes mislead.
The practical approach most teams land on is layered: a physical model or site visit for massing and context, CGI stills or animations for material and lighting decisions, and VR for the specific moments where spatial feel is the deciding factor. None of these replaces professional design judgement. The ARB frames digital tools as part of professional presentation, not a substitute for it, and the sharpest CGI briefs ask which specific decision each image is meant to support rather than chasing photorealism for its own sake.
When should CGI stay simple, and when should it push for realism?
Fidelity should match how much weight a decision carries, not how impressive the client wants the pitch deck to look — this aligns with Architecture SEO Services guidance on matching deliverable fidelity to audience and approvals. Early-stage layout exploration barely needs texture detail; a planning submission needs documented accuracy. The simplest visualisation that’s accurate enough for the decision at hand is usually the right one, and that principle also applies to environmental or landscaping options, where showing planting maturity honestly matters more than showing it beautifully.
— Paride
How Visualtrick supports your option decisions
If you’ve been weighing up real-time engines, offline renderers, and configurator platforms for your next project, the harder question is usually who actually builds and manages the option set for you. Some providers handle that end to end, working from a single reusable model rather than rebuilding scenes for every variant, with all production kept in-house so timelines don’t depend on a subcontractor’s availability.

The full service range covers Architectural Visualisation, Interior and Exterior CGI, Planning Visuals with verified methodology, and 3D Animation for stakeholder walkthroughs. Every commission starts with an option matrix and a locked camera and lighting setup, so the images you compare reflect design differences, not photographic ones, and every approval gets recorded against a named variant. If you’re planning a comparison set, whether for client sign-off, a planning submission, or a marketing pack, share your brief and request a quote to see how the workflow fits your schedule.
Sources
- Checklist before hiring an architect — Architects Registration Board
- 5 surprising, hidden benefits of 3D CGI architecture for design teams — Build Magazine
- Lumion — real-time visualisation product pages
- Twinmotion — real-time visualisation tool pages
- Spline — 3D product configurator solution notes
FAQ
What Is CGI in Graphic Design?
CGI stands for computer-generated imagery, the use of 3D software to build and render visual scenes rather than photographing them. In architecture and interior design, it means building a digital model of a space or building and rendering it under different materials, layouts, or lighting to compare design options before construction.
Can I Make My Own CGI?
Basic CGI is possible with consumer real-time tools, and hobbyist results have improved considerably. For anything feeding a planning application, client presentation, or marketing campaign, a professional service such as Visualtrick is the more reliable route, since planning-grade imagery needs documented methodology that self-taught workflows rarely include.
What Are the Different Types of CGI Used for Design Options?
The main categories are static stills, 360° panoramas, animated walkthroughs, and interactive configurators, each suited to a different kind of decision. Verified photomontages sit in their own category for planning-sensitive work, since they require documented camera, lens, and survey data alongside the image itself.
Is CGI Still Used in Design and Architecture?
Yes, CGI is standard practice across architecture, interior design, and property marketing, not a fading trend. Real-time engines have made it faster to produce and compare multiple options than it was even a few years ago, which has if anything increased how often it’s used at the early decision stage rather than only for final marketing images.
How Much Does CGI for Design Options Cost?
There is no universal price, since cost depends on model complexity, the number of options, and whether interactivity or verified accuracy is required. Visualtrick does not publish a fixed rate; current pricing is available by requesting a quote directly through its services page.
