
Interior styling CGI produces photoreal, styled interior scenes used for marketing, planning submissions, and design specification. Brief a specialist studio with your plans, mood board, and key material references, and you can receive both lifestyle renders and planning-grade visuals from a single modelling investment. Before you send anything, gather your CAD files, dimensions, material swatches, and target output formats. Then contact Visualtrick to discuss deliverables.
What to prepare before you brief:
- CAD plans and elevations (PDF or DWG)
- Key dimensions and ceiling heights
- Material samples or finish references (paint codes, fabric swatches, tile specs)
- A mood board or reference photography showing the desired atmosphere
- Target outputs: stills, panoramas, walkthrough, or planning photomontage
- Intended use: marketing, planning application, investor pitch, or specification sign-off
Key takeaways
Interior styling CGI delivers the most value when the brief is complete, the deliverables are agreed up front, and the studio has demonstrable planning-grade experience alongside marketing render capability.
| Point | Details |
|---|---|
| Brief completeness saves cost | Supply CAD files, mood board, material specs, and target outputs before modelling starts to avoid revision overruns. |
| Bundle deliverables from one model | Commissioning silo and lifestyle renders together shares the modelling cost and reduces per-image spend. |
| Planning experience matters | For planning submissions, confirm the studio’s photomontage methodology and UK local authority experience before hiring. |
| Agree specs before production | Settle resolution, colour profile, file format, and revision rounds in writing at brief stage, not at delivery. |
| Visualtrick as recommended studio | Visualtrick produces interior styling CGI, planning-grade photomontage, and lifestyle renders for UK designers, architects, and developers from a single model build. |
Table of Contents
- What is interior styling CGI, and how does it differ from virtual staging?
- What services and deliverables does a CGI studio typically provide?
- What does the project workflow look like from brief to final render?
- How do you brief a CGI studio and choose the right UK provider?
- What styling techniques make CGI interiors feel believable?
- What technical specifications should you agree before production starts?
- Where does interior styling CGI add the most value?
- What do timelines and pricing look like for UK projects?
- Why Visualtrick approaches interior styling CGI this way
- Visualtrick’s interior CGI services: what you get and how to start
- Useful resources for practitioners
- Sources
What is interior styling CGI, and how does it differ from virtual staging?
Interior styling CGI is the practice of creating photorealistic interior scenes in 3D software, where a specialist artist builds the space, places furniture and props, sets lighting, and renders the result to a standard indistinguishable from location photography. The industry term is architectural visualisation or interior visualisation, though “interior styling CGI” accurately describes the styling-led, mood-board-driven approach that distinguishes marketing renders from purely technical drawings.
The confusion with adjacent services is common, so the distinctions matter:
- Interior styling CGI: A fully custom scene built from your plans and material specifications. Used for marketing, planning, and specification. Every element is modelled or sourced to match the design intent.
- Virtual staging: Existing photography of an empty room with digitally inserted furniture. Faster and cheaper, but limited to what the photograph shows. No lighting control, no planning-grade accuracy. Virtual staging suits estate agents presenting vacant properties; it does not suit developers specifying bespoke interiors.
- Silo product renders: Isolated product images on a plain or transparent background. No environment, no context. Useful for e-commerce catalogues but not for communicating a room’s atmosphere.
- Architectural visualisation: Covers both exterior and interior CGI, often including planning-grade photomontage where the render is composited onto a verified photograph of the actual site.
Choose interior styling CGI when you need to communicate atmosphere, material quality, and spatial experience before a space is built. Choose verified photomontage when a planning authority requires the proposed interior to be shown in its real context.
What services and deliverables does a CGI studio typically provide?
A full-service studio covers the entire chain from concept to final file. Typical services include:
- Concept styling and mood boards: Translating a brief into a visual direction before any modelling begins
- Asset modelling: Building bespoke furniture, joinery, or fixtures from drawings when off-the-shelf library models do not match the design
- Material libraries: Mapping client-specified finishes, fabrics, and surfaces onto 3D geometry
- Lighting and environment setup: Configuring natural and artificial light sources, HDRI environments, and camera positions
- Still renders: Single-frame images at agreed resolution
- 360° panoramas: Navigable spherical views for web embedding or VR headsets
- Walkthrough animations: Fly-through or walk-through video sequences
- Verified photomontage: Planning-grade composites where the CGI is placed into a calibrated photograph of the real site
Deliverable formats to specify up front:
- Web stills: JPEG or PNG at 2K (2048px on the long edge), sRGB colour profile
- Print: TIFF or high-resolution JPEG at 300 dpi, Adobe RGB or CMYK
- Planning submissions: as specified by the local authority, typically high-resolution JPEG or PDF with a methodology statement
- Editable project files: on request, studios may supply the scene file (3ds Max, Cinema 4D, or Blender) for future reuse
One of the most cost-effective decisions you can make is to commission both silo product images and full lifestyle scenes in a single project. Silo and lifestyle renders come from the same 3D model, so ordering both at once avoids duplicating the modelling cost entirely. A single modelling investment gives you e-commerce product shots, hero marketing images, and campaign variations without rebuilding anything.
What does the project workflow look like from brief to final render?
A well-run interior CGI project follows a clear sequence of stages, each with defined inputs and sign-off points.
Stage 1: Discovery and brief
The studio reviews your plans, elevations, and mood board. They confirm scope, deliverable count, and timeline. You supply CAD files, material references, and any brand guidelines. Tools like Krea’s AI interior design tool are useful here for rapid style exploration before committing to a full brief, letting your team converge on a direction quickly.
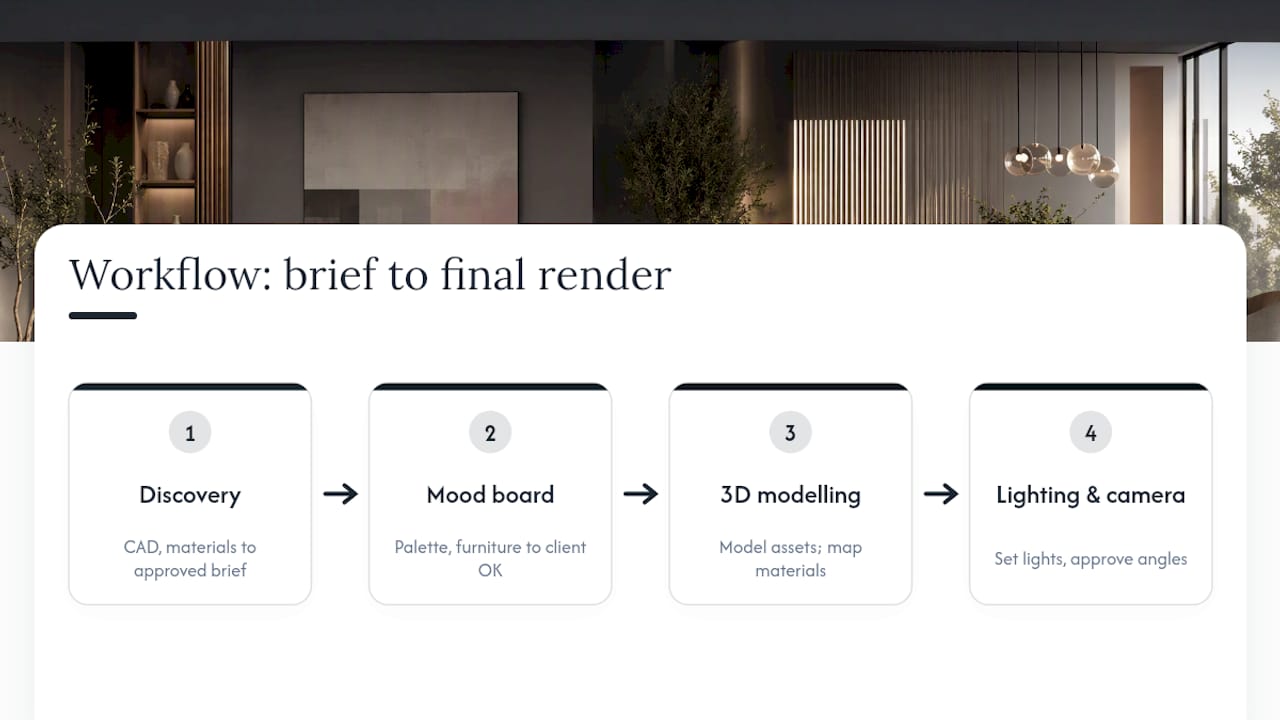
Stage 2: Mood board and concept approval
The studio presents a styled mood board showing the proposed palette, furniture selection, lighting direction, and camera angles. This is the cheapest point to change direction. Sign off here before modelling begins. CGI communicates interior design concepts most effectively when the mood board and the final render share a clear visual logic.
Stage 3: 3D modelling and material set
The space is built in 3D. Bespoke assets are modelled from drawings; library assets are sourced and adapted. Materials are mapped and adjusted for physical accuracy. Browser-based platforms like Planner 5D can accelerate early concept testing, but they do not replace custom modelling when unique fixtures or planning accuracy are required.

Stage 4: Lighting and camera passes
The artist sets up light sources, tests camera positions, and produces grey-box or clay renders for client review. Approving camera angles at this stage avoids expensive re-renders later.
Stage 5: Rendering and post-production
Final renders are produced at the agreed resolution. Post-production adds colour grading, depth of field, and any compositing. For planning submissions, this stage includes photomontage verification.
Stage 6: Sign-off and delivery
Files are delivered in agreed formats. Revision rounds are completed. The studio retains the model for future reuse unless the brief specifies otherwise.
On timelines: small projects (one to three rooms, standard assets) typically run two to four weeks from approved brief to final delivery. Medium projects (four to eight rooms, some bespoke modelling) run four to six weeks. Large or complex schemes, including animation or verified photomontage, should be budgeted at eight to twelve weeks. Build in a buffer for client revision rounds at each stage.
How do you brief a CGI studio and choose the right UK provider?
What to include in your brief
- Full CAD plans and elevations, including ceiling heights and any structural constraints
- A mood board with three to five reference images showing the desired atmosphere
- Material specifications: paint references, fabric samples, tile codes, and any bespoke joinery drawings
- A list of deliverables with intended use (web, print, planning, VR)
- Target resolution and file format for each output
- Timeline and any fixed deadlines (planning submission dates, marketing launch)
- Revision policy expectations: how many rounds are included, and at what stages
Questions to ask a UK studio before you hire
- Can you show planning-grade photomontage examples from previous UK projects?
- Which render engines do you use? (V-Ray, Corona, and Unreal Engine are the industry benchmarks for photorealism and real-time output respectively.)
- What is your revision policy, and at which stages are revisions included?
- Who owns the 3D model and scene files after delivery?
- What is your turnaround time for a project of this scope?
- Do you have experience with CGI for planning applications?
Red flags to watch for
- Portfolio images with inconsistent scale (furniture that looks too large or too small for the space)
- Flat, uniform lighting with no shadow variation or depth
- Vague delivery specs (“high resolution” with no pixel count or DPI stated)
- No examples of planning-grade or photomontage work
- Opaque pricing with no breakdown of modelling versus rendering costs
- No clear revision policy in writing
High-end studios deliver planning-grade visuals and verified photomontage that meet local authority expectations. Confirm the studio’s photomontage methodology and any verification steps during the tender process.
What styling techniques make CGI interiors feel believable?
The gap between a convincing render and an obviously artificial one usually comes down to a handful of styling decisions, not the render engine.
Contextual believability means the scene looks lived-in without looking messy. A perfectly symmetrical arrangement of props reads as staged. A slightly asymmetric stack of books, a cushion with a soft crease, or a glass placed just off-centre signals that a human being occupies the space. Physically based rendering engines such as Corona and V-Ray handle material behaviour accurately, but the artist still has to make the scene feel inhabited.

Pro Tip: Set your hero material (the sofa fabric, the stone worktop, the feature wall) as the visual anchor, then build the rest of the palette around it. Supporting props should complement, not compete. A busy background kills a hero product faster than poor lighting.
Specific techniques that increase believability:
- Mixed light sources: Combine warm window light with cooler ambient fill. Pure daylight or pure artificial light reads as a test render.
- Side-grazing light for texture: Raking light across a textured surface (linen, brick, plaster) reveals depth that flat frontal lighting erases.
- HDRI environments: Use a high-quality HDRI for accurate reflections in glass, metal, and gloss surfaces. Generic sky domes produce flat, unconvincing reflections.
- Fabric behaviour: Soft furnishings should show gravity. A perfectly flat cushion or a curtain with no drape looks like a CAD block, not a textile.
- Colour hierarchy: One dominant colour, one secondary, one accent. More than three competing tones fragment the composition.
- Natural imperfections: Slight fingerprints on a tap, a small shadow under a rug edge, a plant leaf that breaks the frame slightly. These micro-details are what make viewers stop and look twice.
3D lifestyle images can be produced without a physical sample and consistently outperform white-background product photography for engagement and conversion in home décor categories, precisely because these styling choices close the imagination gap that flat product shots leave open.
What technical specifications should you agree before production starts?
Agreeing output specifications before modelling begins prevents expensive rework at delivery. The key parameters:
- Still renders: 4K (3840 × 2160px) for hero marketing images; 2K (2048px long edge) for web use. JPEG at 90–95% quality for web; TIFF for print.
- Print: 300 dpi minimum at final print size. Adobe RGB colour profile for offset print; CMYK conversion handled by the printer or pre-press studio, not the CGI artist.
- Planning submissions: Check the local authority’s specific requirements. Most UK planning portals accept JPEG or PDF; some require a methodology statement alongside photomontage images.
- Compositing and post-production: EXR (OpenEXR) multi-pass files allow colour grading and compositing in post without re-rendering. Request these if your team will do further retouching.
- Model exchange: FBX or OBJ for geometry exchange between software packages. Confirm the target application before export, as material data transfers inconsistently between platforms.
- VR and real-time: Polygon budgets matter. Unreal Engine and Unity have different LOD (level of detail) requirements. Agree polygon counts, texture sizes (typically 2K or 4K textures per asset), and target frame rate before the model is built.
- Colour management: sRGB for all web and screen outputs. Mismatched colour profiles between the render and the delivery format are a common source of colour shift that looks like a render error but is a file-handling issue.
3D visualisation supports interior specification most effectively when the file exchange protocol is agreed at brief stage, not after the model is complete.
Where does interior styling CGI add the most value?
The strongest use cases share one characteristic: the space does not yet exist, or cannot be photographed in its final state.
- Off-plan sales brochures: Developers selling units before construction is complete need interior visuals that match the specification exactly. A lifestyle render showing the kitchen finish, flooring, and furniture package closes sales that floor plans cannot.
- Estate agent listings: CGI for estate agents helps present vacant or unfinished properties at their best, without the cost of physical staging.
- Investor pitch decks: A well-styled interior render communicates quality and intent to investors faster than a written specification. The image does the work a paragraph cannot.
- Planning applications: Verified photomontage places the proposed interior or extension into a calibrated photograph of the real site, meeting local authority requirements for accuracy. Planning visuals produced to this standard reduce the risk of objections based on visual impact.
- Specification sign-off: Showing a contractor or client the exact finish, material, and layout before work begins reduces on-site changes. A render is cheaper than a site alteration.
- Furniture and décor marketing: 3D lifestyle scenes close the imagination gap that flat product photography leaves open, making them particularly effective for home décor brands launching new collections.
When to prefer each output type: lifestyle renders for marketing and sales; verified photomontage for planning; real-time walkthroughs for investor presentations and show-home replacements where the audience needs spatial understanding, not just a hero image.
What do timelines and pricing look like for UK projects?
Turnaround and cost vary with complexity, but the primary drivers are consistent across studios.
Primary cost drivers:
- Modelling complexity: Bespoke joinery, unusual geometry, and custom furniture all require more modelling time than library assets.
- Number of unique assets: Each unique piece of furniture or fixture that needs modelling adds cost. Reusing assets across rooms reduces it.
- Resolution and post-production: 4K renders with multi-pass compositing cost more than 2K web images with basic colour grading.
- Revision rounds: Revisions after sign-off at a completed stage are the most common source of budget overrun. Agree revision rounds in writing before the project starts.
- Licensing and usage: Unlimited commercial usage typically costs more than a limited web licence. Clarify usage rights before delivery.
On reducing cost: the most effective lever is commissioning both silo and lifestyle images in one project. Both outputs come from the same 3D model, so the modelling cost is shared across more deliverables. Similarly, reusing a model across multiple rooms or marketing phases reduces the per-image cost significantly.
Typical turnaround:
- Small project (one to three rooms, standard assets): two to four weeks
- Medium project (four to eight rooms, some bespoke modelling): four to six weeks
- Large or complex (animation, VR, verified photomontage): eight to twelve weeks
Ballpark pricing in the UK market varies widely by studio tier and project scope. Silo renders from specialist studios typically start from around £150–£300 per image; full lifestyle scenes from approximately £250–£600. These figures reflect industry-standard ranges and will shift with project complexity, revision rounds, and the studio’s level of specialisation.
Why Visualtrick approaches interior styling CGI this way
The projects that go smoothly share a common pattern: the brief is clear, the mood board is agreed before modelling starts, and the client understands which deliverables they need and why. Where projects stall, it is almost always because the styling direction was left open too long, or because the brief asked for a lifestyle render when a planning-grade photomontage was actually required.
My view is that the most valuable thing a studio can do is help a client understand the difference between those outputs before the model is built, not after. Visualtrick works across architectural visualisation, interior CGI, and planning-grade photomontage, which means the same model can serve a marketing campaign, a planning submission, and a contractor specification brief without being rebuilt. That model reuse is where the real cost saving sits, and it is why we push clients to think about all their deliverable needs at brief stage rather than commissioning them piecemeal.
The sectors we work with most often, property developers, architects, interior designers, and estate agents, all need visuals that hold up to scrutiny. A planning authority will examine a photomontage closely. An investor will zoom into a render on a large screen. The styling and technical accuracy have to be right at every scale.
Visualtrick’s interior CGI services: what you get and how to start
Visualtrick delivers interior CGI for designers and developers across the UK, from single-room lifestyle renders to full planning-grade photomontage packages. A typical project combines a styled lifestyle still for marketing, a silo product image for specification, and a planning visual for submission, all produced from one model build. That structure keeps costs down and delivery times predictable.

The team works with interior designers, architects, property developers, and estate agents, covering everything from off-plan sales brochures to investor pitch visuals and CGI for architects on planning-sensitive schemes. To start, send your plans, mood board, and a list of target outputs. Visualtrick will confirm scope, timeline, and pricing within one working day. Get in touch via the interior CGI service page to brief the studio directly.
Useful resources for practitioners
- Silo vs. Lifestyle Rendering: Which Do You Need? — a clear breakdown of when each output type is appropriate and how bundling both from one model reduces cost.
- 3D lifestyle images for home décor brands — practical staging, lighting, and composition guidance for producing lifestyle renders that convert.
- Krea AI interior design tool — useful for rapid early-stage style exploration and client mood board iteration before commissioning custom CGI.
- Planner 5D — browser-based 3D design with 4K render output; good for quick concept testing, though not a substitute for bespoke studio CGI on planning or specification projects.
- Homestyler — cloud-based design tool with a large model library, suited to ideation and client workshops rather than final marketing or planning deliverables.
- How CGI communicates interior design concepts — Visualtrick’s own guide to translating mood boards into render decisions.
- How 3D visualisation supports interior specification — technical guidance on file exchange and specification workflows for practitioners briefing a studio.
Sources
- Silo vs. Lifestyle Rendering: Which Do You Need? | NewYorkCGI
- 3D lifestyle images for home decor brands: how to stage a scene that sells without a physical sample – 360 Render
- Free AI interior design tool: Redesign any room | Krea
- Planner 5D: House design software | Home design in 3D
- Free 3D home design software | Homestyler
