
A well-written visualisation brief is the single document that determines whether your 3D visuals will support a planning application or undermine it. Get it right, and the visualiser has everything needed to produce accurate, planning-ready images first time. Get it wrong, and you face costly revisions, missed deadlines, and renders that planning officers question on technical grounds.
The brief’s job is to translate your planning objectives into clear instructions for whoever is producing the CGI. CGI visualisations help project teams, consultants, councils, and stakeholders understand design, scale, materials, and visual impact more clearly than drawings alone. A strong brief covers seven core components:
- Planning purpose — pre-application, submission, public consultation, or committee
- Current design files — CAD, Revit, SketchUp, or agreed 3D model exports
- Agreed viewpoints — specific locations confirmed with the architect, planning consultant, or local authority
- Site and context information — photographs, mapping, survey data, aerial images, and boundary details
- Material specifications — brick, cladding, glazing, roof finishes, paving, and planting references
- Output requirements — image size, file format, review stages, and deadline
- Sign-off process — who approves the model, materials, camera positions, and final images
Visualtrick works with planning consultants, architects, and developers across the UK to produce planning-ready CGI built from exactly this kind of structured brief. The difference between a smooth project and a frustrating one almost always comes down to what was written down before production started.
Table of Contents
- How to prepare a clear visualisation brief for planning
- What technical specifications does a CGI render brief need?
- How does a 3D visualisation project actually run?
- UK planning guidance you need to know before writing your brief
- Key takeaways
How to prepare a clear visualisation brief for planning
The preparation process follows a logical sequence. Skipping steps early creates problems late.
-
Define the planning purpose first. State whether the visuals are for pre-application advice, a formal submission, public consultation boards, or planning committee material. This single decision shapes every other requirement, from the level of photorealism needed to the number of viewpoints.
-
Identify your key stakeholders and the single sign-off decision-maker. Conflicting feedback from multiple reviewers is one of the most common causes of project delays. Name one person who has final authority over the model, materials, camera positions, and finished images. Everyone else feeds into that person.
-
Gather and check your design files before sending them. Outdated drawings produce inaccurate models. Confirm that the files you supply reflect the current design, including any revisions made since the last issue. CAD, Revit, and SketchUp files are all workable inputs; the key is accuracy, not format.
-
Select and agree viewpoints with your planning consultant or local authority. For major applications, viewpoints and format are typically determined through pre-application discussions. Agreeing these early avoids producing renders from positions that officers later reject.
-
Compile site context data. This means site photographs taken at the agreed camera positions, mapping, topographical survey data, aerial imagery, and information about neighbouring buildings. The more complete this package, the more accurately the visualiser can place the model in its real setting.
-
Specify materials with references, not descriptions. “Red brick” is not a specification. A manufacturer name, product code, or physical sample photograph is. The same applies to glazing, cladding, roofing, and landscaping. Vague material briefs produce generic renders that fail to represent the actual design.
-
Set timelines and budget expectations upfront. State your submission deadline and work backwards to allow time for briefing, modelling, draft review, revisions, and final sign-off. Rushed final stages are where errors creep in.
-
State output requirements explicitly. Confirm image resolution, file format (TIFF, JPEG, PDF), whether images sit within a report or presentation, and any specific size constraints. Some local authorities impose file size limits on portal uploads, so check before commissioning large format outputs.
-
Flag common pitfalls in the brief itself. Note any known constraints: restricted access for site photography, neighbouring buildings that are difficult to survey, or design elements still under review. Transparency at briefing stage prevents assumptions that cost time later.
Pro Tip: Use a numbered checklist within your brief document so the visualiser can confirm receipt of each item. Missing files are far easier to catch before production starts than after a model has been built on incomplete information.
What technical specifications does a CGI render brief need?
The technical section of your brief is where planning applications are won or lost. Planning officers and landscape consultants scrutinise renders for accuracy, and a visually impressive image that fails on technical grounds carries no evidential weight.
Digital design files
Supply the most current version of your design files in their native format where possible. CAD drawings, Revit models, SketchUp files, and 3D model exports are all usable. State the software version and confirm the units of measurement (metres, centimetres, or millimetres). For major applications in cities using VuCity software, a simplified geolocated .fbx massing model can accelerate the validation process considerably. Islington Council’s validation requirements specify that massing models should be submitted in .fbx format, geolocated by OS Grid Coordinates, with material details and structural information omitted from the file.
Output requirements
Be specific about what you need and why. A render destined for a planning report has different resolution requirements from one used on a consultation exhibition board. Photomontages and verified visual montages for designated views require annotated elevations and specific technical methodology documentation.
Material specifications
| Material category | What to include in the brief |
|---|---|
| Brickwork | Manufacturer, product name, bond pattern, mortar colour |
| Cladding | Material type, finish, panel size, fixing system |
| Glazing | Frame colour, glass type, reflectivity level |
| Roofing | Tile or membrane type, colour, profile |
| Landscaping | Species names, hard surface materials, boundary treatments |
Accuracy versus artistic rendering
High-end artistic renders risk credibility loss in technical planning submissions if they over-glamourise the design. Verified views use surveyed camera positions, accurate model placement, and agreed methodology to show how a proposal would appear from a specific viewpoint. They are objective, annotated, and technically defensible. Standard CGI renders or contextual photomontages may be sufficient for lower-risk applications, but on sensitive sites, verified views carry far more weight with planning officers.
Project timeline
| Stage | Typical duration |
|---|---|
| Brief submission and file review | 2–3 days |
| 3D modelling | 5 days |
| Draft renders for review | 3–5 days |
| Client feedback and revisions | 3–5 days |
| Final approved outputs | 2–3 days |
Timelines vary with project complexity. A straightforward residential scheme moves faster than a mixed-use development requiring verified views and townscape analysis.
How does a 3D visualisation project actually run?
Understanding the production workflow helps you write a better brief and manage your team’s expectations throughout the project.
The process begins with a briefing meeting or document exchange. The visualiser reviews all supplied files, flags any gaps, and confirms the scope before production starts. This is the moment to resolve ambiguities, not after modelling has begun.
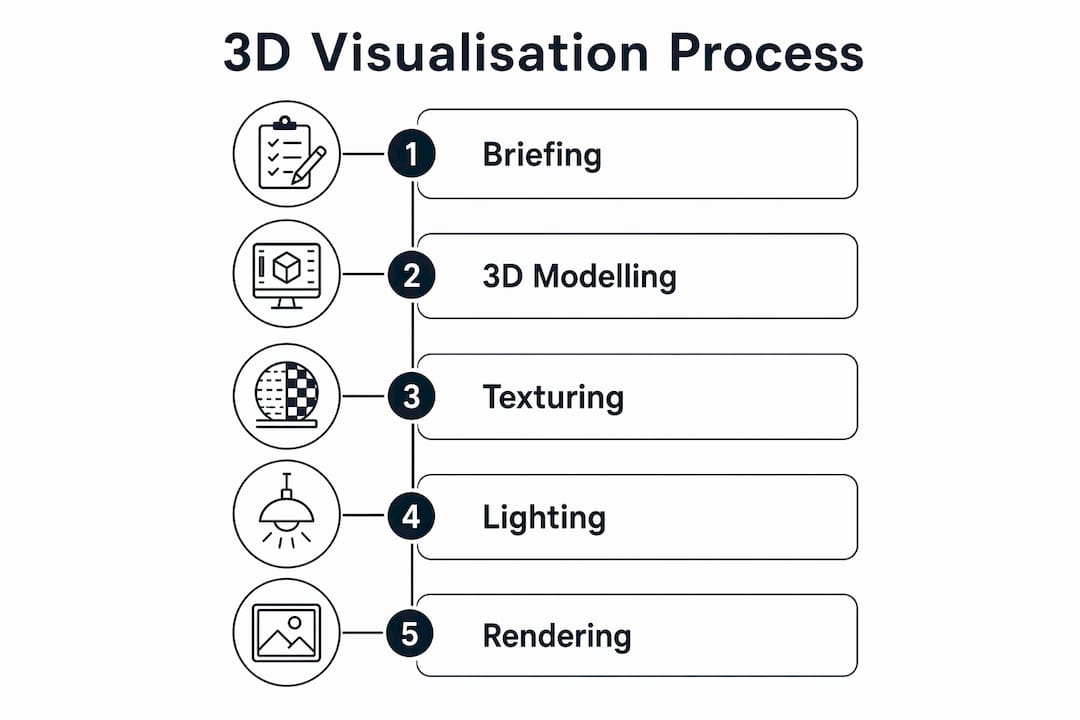
Production moves through four phases: modelling, texturing, lighting, and rendering. Modelling builds the 3D geometry from your design files. Texturing applies material finishes. Lighting simulates the conditions at the agreed time of day and season. Rendering produces the final image output. Each phase builds on the last, so errors caught at modelling stage cost far less to fix than those discovered after rendering.
Review stages are built into the workflow at key checkpoints. The first review typically covers the 3D model before texturing begins. The second covers draft renders before final production. Clear, consolidated feedback at each stage keeps the project moving. The workflow from briefing to delivery works best when each review is handled by the named sign-off decision-maker rather than distributed across the whole project team.
Best practices for managing the process:
- Consolidate all feedback into a single document before sending it to the visualiser
- Mark up images directly using annotation tools rather than describing changes in prose
- Confirm approval of each stage in writing before the next phase begins
- Keep the planning consultant involved at draft review stage, not just at final sign-off
- Allow buffer time between final approval and your submission deadline
Early engagement with your visualiser pays dividends. Bringing them into pre-application discussions means they understand the planning context, the sensitivity of the site, and the level of technical rigour required before a single model is built.
UK planning guidance you need to know before writing your brief
UK planning authorities require 3D visualisations primarily for major developments to illustrate visual impact, with specific requirements set through pre-application discussions. The format, level of detail, and number of viewpoints depend on the scale of the scheme and the sensitivity of its setting. Wirral Council’s local validation checklist confirms that 3D visualisations are required for all major applications comprising the erection of new buildings.
The Landscape Institute’s GLVIA3 guidelines set the professional standard for visual representation in planning. The core principle is proportionality: visualisation complexity should match the scale and sensitivity of the development. A small residential scheme in a low-sensitivity location may need only annotated photographs or simple wirelines. A large mixed-use development in a sensitive townscape setting may require verified photomontages and a full Landscape and Visual Impact Assessment.
The Landscape Institute is clear on this point: overly detailed early-stage visualisations cause expensive rework. The focus at initial planning stages should be on scale, height, and mass rather than photorealism. Committing to a highly finished render before the design is fixed locks you into a version that may need to change, and changing it costs time and money.
Common pitfalls in planning visualisation briefs:
- Requesting photorealistic renders before the design has been fixed, leading to expensive revisions
- Failing to agree viewpoints with the local authority before commissioning, resulting in rejected outputs
- Supplying outdated design files that produce inaccurate models
- Omitting material specifications and expecting the visualiser to make assumptions
- Confusing marketing renders with planning-grade verified views
Visualtrick’s architectural visualisation services are built around the accuracy and restraint that planning submissions require. The distinction between a persuasive marketing image and a technically defensible planning visual is not subtle. Planning officers notice when a render uses unrealistic lighting or hides constraints, and that credibility loss can affect the outcome of an application. Every visual Visualtrick produces for planning purposes is grounded in the supplied design data, agreed viewpoints, and the specific requirements of the relevant local authority.
For multi-disciplinary teams, the brief also needs to account for how visuals will be used across different documents: design and access statements, planning statements, consultation boards, and committee packs may all require different formats or levels of detail from the same underlying model.
Key takeaways
A clear, detailed visualisation brief is the foundation of every successful planning CGI project, covering scope, stakeholders, technical inputs, and a named sign-off process from the outset.
| Point | Details |
|---|---|
| Seven core components | Every brief needs planning purpose, design files, viewpoints, site context, materials, output specs, and a sign-off process. |
| Proportionality principle | Match visualisation complexity to project scale and site sensitivity, following Landscape Institute GLVIA3 guidance. |
| Verified views for sensitive sites | Use surveyed, annotated verified views where visual impact, heritage setting, or townscape sensitivity is a planning concern. |
| Single sign-off decision-maker | Name one person with final approval authority to prevent conflicting feedback and project delays. |
| Early engagement saves money | Bringing the visualiser into pre-application discussions avoids costly rework caused by late design changes or rejected viewpoints. |

Visualtrick produces planning-ready CGI for developers, architects, and planning consultants across the UK. Whether you need verified views for a major submission, photomontages for a public consultation, or CGI for architects working through a complex planning process, the team works from structured briefs to deliver accurate, credible visuals that hold up to scrutiny. Speak to Visualtrick about your next project at visualtrick.co.uk.
