
For planning pitches, use verified photomontage (Type 3 or Type 4 under UK planning guidance). For investor pitches, lead with photoreal exterior CGI and a short flythrough. For marketing and sales, interior lifestyle renders and 3D floor plans convert best. The decision anchor throughout is GLVIA3 proportionality: match the sophistication of the visual to the site sensitivity, the scale of change, and the audience reviewing it.
At a glance:
- Verified photomontage (Type 3/4) — planning applications and EIA submissions where evidentiary accuracy is required
- Photoreal exterior CGI — investor decks, JV pitches, and planning committee presentations
- Interior lifestyle renders — off-plan sales, marketing suites, and brochures
- 3D flythrough/animation — investor roadshows, trade show displays, and public consultation
- 360/VR panorama or interactive web viewer — stakeholder engagement and premium investor packs
Table of Contents
- Which visual formats serve which pitch job?
- A catalogue of the top formats used in UK projects
- How do you choose the right level of sophistication?
- What should a technical brief include?
- What do UK commissions typically cost and how long do they take?
- Common mistakes when commissioning visuals
- How Visualtrick organises multi-format visualisation workflows
- Tailoring formats to specific disciplines within multi-discipline projects
- How do you coordinate multiple formats into a cohesive pitch?
- How to brief collaborative teams and external agencies for consistent visuals
- Visualtrick delivers planning-ready visual packs for every pitch stage
- Key takeaways
- Why proportionality matters more than production value
- Useful sources and further reading
Which visual formats serve which pitch job?
The format you choose should follow the decision that the audience needs to make, not the budget available or the format your team finds easiest to brief.
- Verified photomontage (Type 3/4) → planning evidence: shows the proposed scheme accurately within its real context; planning authorities need accurate visuals that meet verification standards
- Photoreal exterior CGI → investor persuasion: communicates design quality, materiality, and neighbourhood fit at a glance
- Aerial/drone view → planning and investor: establishes site context, access, and massing relationships quickly
- Interior lifestyle render → sales conversion: puts the buyer or tenant inside the space emotionally before a brick is laid
- Massing/block model → early planning and design team coordination: communicates scale without committing to materials
- 3D flythrough/animation → investor roadshows and trade shows: holds attention and sequences the story of the scheme
- 360/VR panorama → stakeholder consultation and premium investor packs: immersive without requiring specialist hardware
- Interactive web viewer/AR → marketing launches and public engagement: shareable and accessible on any device
Pro Tip: Identify your primary audience before briefing a single format. A planning consultant and an investor fund manager need fundamentally different things from the same scheme. Locking the audience first prevents the one-size-fits-all brief that produces visuals nobody can actually use.
A catalogue of the top formats used in UK projects
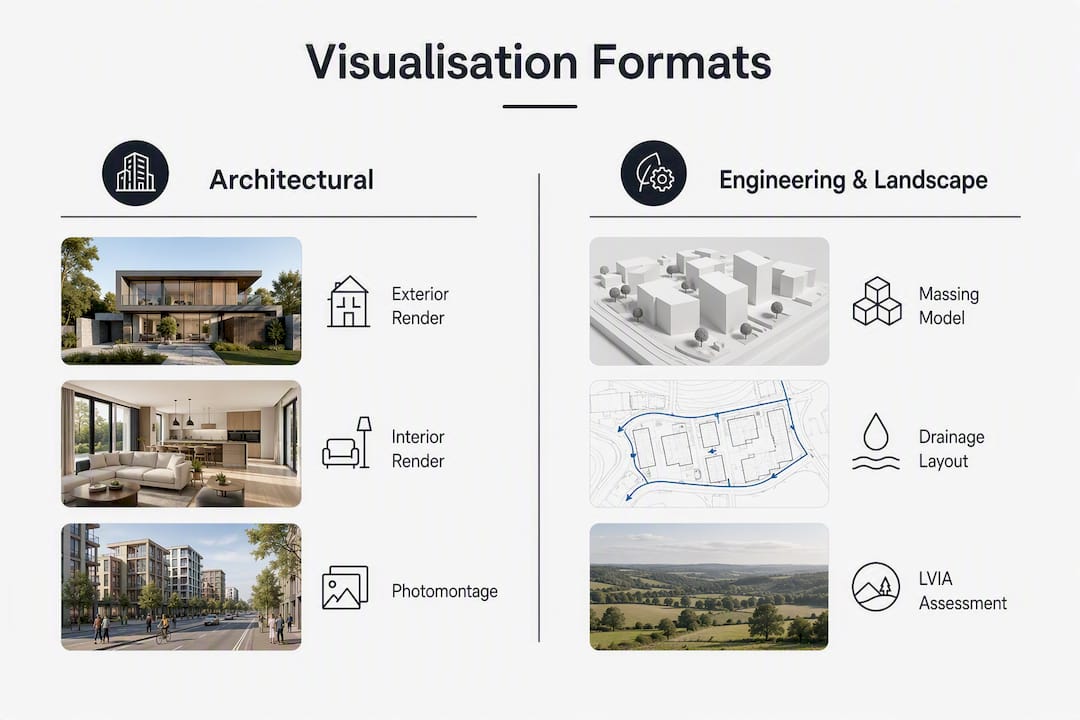
Exterior photoreal render — a photorealistic still image of the proposed building in its setting, typically delivered as a high-resolution TIFF or JPEG at print and screen resolutions. The primary audience is planners, investors, and marketing teams. It works for most pitch types; the caution is that it must reflect accurate massing and materials, not an aspirational version of the scheme.
Interior render — a photorealistic still of an internal space, showing finishes, furniture, and natural light. Delivered as TIFF/JPEG. Primarily for sales, marketing, and interior design proposals. Avoid using interior renders as planning evidence; they rarely address the contextual questions a planning officer needs answered.
Verified photomontage (Type 3/4) — a composite image combining a calibrated site photograph with a precisely positioned 3D model. Type 4 images require reproducible methodology so that third parties can verify scale and camera data. Delivered with a verification pack (survey files, camera metadata, model coordinates). Reserved for sensitive sites and EIA submissions.
Aerial/drone view — a rendered or composited bird’s-eye image showing the scheme within its wider context. Useful for masterplans, large residential schemes, and investor decks. Delivered as TIFF/JPEG; resolution requirements vary by reproduction size.
Massing/block model — a simplified 3D model render showing form and scale without material detail. Fast to produce and ideal for early-stage planning discussions and design team coordination. Delivered as JPEG or PDF.
3D flythrough/animation — a rendered video sequence moving through or around the scheme. Delivered as MP4 at 1080p or 4K. Powerful for investor presentations and trade shows; budget and lead time are higher than for stills.
360/VR panorama — an immersive spherical image or sequence viewable on a headset or in a browser. Delivered as an equirectangular JPEG or embedded web viewer. Useful for public consultation and premium investor packs; technical quality depends on model completeness.
Interactive web viewer/AR — a browser-based or app-based tool allowing the viewer to navigate the model or overlay it on a real site via a device camera. AR accuracy depends on GPS precision, model alignment, and device display resolution, so it suits marketing engagement rather than planning evidence.
Pro Tip: A small, well-chosen pack covering a verified exterior view, two interior lifestyle renders, and a 60-second flythrough often satisfies planning, investor, and sales audiences from a single production run. Commissioning each format in isolation costs more and produces inconsistent outputs.
How do you choose the right level of sophistication?
The single rule: apply GLVIA3 proportionality. The level of visualisation should match the site sensitivity, the scale of change, and the purpose of the assessment, not the ambition of the design team.
Practical decision criteria:
- Site sensitivity — a conservation area, AONB, or listed building setting justifies Type 4 verification; a low-impact infill site in a suburban context rarely does
- Scale of change — large-footprint or tall buildings warrant more rigorous visual evidence than small extensions
- Planning authority expectations — some local authorities specify visual requirements in their validation checklists; check these before briefing
- Investor appetite — institutional investors expect photoreal CGI and animations; private buyers at a sales event respond to interior lifestyle renders
- Consultation stage — early community engagement suits massing models and annotated photographs; committee stage suits verified photomontages
Over-specifying a Type 4 for a low-impact site is an unnecessary expense. Practitioners confirm that requiring images of higher accuracy than proportionality indicates is unreasonable without exceptional circumstances.
Pro Tip: If the planning officer has not requested a verified view and the site is not designated sensitive, a well-executed contextual photomontage (Type 3) usually meets the evidential bar. Save the full verification budget for sites where it genuinely matters.
What should a technical brief include?
A single brief must state the audience, the required viewpoints (verified or not), all deliverables, and file specifications. Ambiguity at brief stage is the most common cause of rework.
Checklist:
- Architectural source files (Revit, DWG, or IFC)
- Measured survey data and OS mapping or LiDAR point cloud
- Agreed camera positions and viewpoint rationale
- Lens data (focal length; guidance recommends a 50mm equivalent for accurate scale representation)
- Material schedules and finish samples
- Lighting brief (time of day, season, sky condition)
- Output sizes, file formats, and colour profiles
- Number of revision rounds and approval process
- Rights and usage licence (planning submission, marketing, investor use)
- Verification evidence required for Type 4 images (survey control points, camera metadata)
| Deliverable | Typical file type | Minimum resolution |
|---|---|---|
| Planning exterior still | TIFF + JPEG | — |
| Investor/marketing still | TIFF + JPEG | — |
| Interior lifestyle render | TIFF + JPEG | — |
| Flythrough/animation | MP4 | 1920×1080 minimum |
| 360 panorama | Equirectangular JPEG | 8000×4000 minimum |
| Verification pack | PDF + native model files | As specified |
Milestone timeline (typical):
- Brief and source file receipt
- Model build and camera position agreement
- First draft renders for review
- Verification check (Type 4 only: survey overlay, scale confirmation)
- Final delivery with rights documentation
For a 3D model to planning image workflow, preserving coordinate systems and survey control points from the outset avoids costly replants at the verification stage.
What do UK commissions typically cost and how long do they take?
Lead times and costs depend on site verification requirements, model complexity, number of viewpoints, and how complete the brief is. Typical lead times vary by format, with simple geometry models delivered quickly and more complex visualisations taking several weeks. Exact durations depend on project specifics. Final quotes depend on briefing completeness, verification requirements, and the number of viewpoints. Early scoping calls reduce surprises.
Schedule risks to plan for:
- Survey delays caused by access restrictions or weather
- Site photography windows (overcast days preferred for photomontage base shots)
- Late design changes that require model rebuilds
- Slow approval cycles within the client team
Common mistakes when commissioning visuals
- No defined audience — brief states “planning and marketing” without specifying which outputs serve which; the result is a single over-produced image that works for neither
- Marketing images used as planning evidence — stylised lifestyle renders with idealised lighting and selective context fail the accuracy test; unverified images used where verification is expected undermine application credibility
- Over-specifying verification — commissioning a full Type 4 study for a low-impact site wastes budget and time
- Poor source data — incomplete DWG files or missing survey data force the production team to make assumptions, which creates inaccuracy
- Mismatch of scale or lighting — a render lit for a summer afternoon submitted in a winter planning context looks implausible to a planning officer
- Late change requests — design changes after model sign-off are the single largest cause of cost overruns
Pro Tip: Ask any prospective visualiser for a sample verification pack from a previous Type 4 commission, not just a portfolio image. The methodology document tells you far more about their process than the finished render does.
How Visualtrick organises multi-format visualisation workflows
Visualtrick delivers planning-ready and pitch-focused visual packs by aligning GLVIA3 proportionality with the specific objectives of each pitch audience. The workflow runs in five stages:
- Intake and scoping — audience identification, viewpoint rationale, and brief completeness check before any modelling begins
- Verification and survey sourcing — coordinate system setup, survey control point integration, and camera lens data capture for Type 4 commissions
- Model build — geometry, materials, and lighting developed to match the agreed brief and output specifications
- Format-specific outputs — stills, animations, 360 panoramas, and web viewers produced from a single coordinated model to maintain consistency across the pack
- QA, verification pack, and delivery — final images checked against source data; verification documentation prepared for planning submissions; rights and usage licences confirmed
Visualtrick’s architectural visualisation services cover the full range from early massing studies through to verified photomontage and investor-grade animations. For joint venture and investor proposals, the same coordinated model underpins both the planning evidence and the investor pack, reducing duplication and keeping the scheme consistent across audiences.

Tailoring formats to specific disciplines within multi-discipline projects
A mixed team of architects, engineers, and landscape architects produces information in different formats and at different levels of detail. The visualisation brief needs to account for all of them.
Architecture typically supplies Revit or DWG files with full material schedules. These feed directly into photoreal exterior and interior renders. The risk is that architectural models often omit surrounding context, so the visualiser needs OS mapping and survey data to complete the scene accurately.
Landscape works to GLVIA3 and produces LVIA assessments that specify viewpoints, receptor locations, and seasonal conditions. Landscape CGI visualisation must align with these viewpoints precisely; a render produced from a different camera position than the agreed LVIA viewpoint is not usable as planning evidence.
Engineering and infrastructure contributes drainage layouts, road alignments, and utility runs that affect the visible ground plane. Including these in the model prevents renders that show a finished scheme floating above an inaccurate site level.
The practical solution is a single coordinated model with named layers for each discipline’s contribution, agreed at the brief stage. Outputs for each audience are then extracted from the same model, which keeps scale, massing, and context consistent regardless of which format is being produced.
How do you coordinate multiple formats into a cohesive pitch?
The most common failure in multi-format pitch packs is inconsistency: the planning photomontage shows the building in one material, the investor CGI shows it in another, and the marketing brochure uses a third. This happens when formats are briefed separately and produced from different model versions.
A single master model, version-controlled and shared across all outputs, solves this. Agree the design freeze date before production begins and enforce it. Any post-freeze design change should trigger a formal change request with a cost and timeline impact assessment.
For the pitch presentation itself, sequence the formats to match the decision journey: open with context (aerial or massing view), establish the scheme (exterior photoreal CGI), take the audience inside (interior renders), then close with movement (flythrough or 360). This structure works for planning committee presentations, investor roadshows, and trade show displays. Large-format reproduction for exhibition boards requires attention to output resolution; exhibition graphics standards set minimum DPI requirements that differ from screen-only outputs.
How to brief collaborative teams and external agencies for consistent visuals
Consistency across a multi-discipline team starts with a single shared brief document, not a chain of emails. The brief should name the lead visualiser, define the master model owner, and set the version control protocol before any agency begins work.
Key briefing principles:
- One point of contact per discipline — prevents conflicting instructions reaching the visualiser simultaneously
- Shared naming conventions — file names, layer names, and material references agreed upfront avoid the “which version is current?” problem at delivery
- Staged sign-off — approve camera positions and model geometry before committing to full photoreal rendering; changes at the lighting and materials stage are far cheaper than geometry rebuilds
- Verification methodology agreed early — if any output requires Type 4 verification, the survey methodology and camera data protocol must be established at brief stage, not discovered at QA
A visualisation brief guide for planning consultancy covers the standard template elements in detail. Sending a completed brief template to any agency at first contact is the fastest way to get an accurate quote and a realistic timeline.
Visualtrick delivers planning-ready visual packs for every pitch stage
When a project needs to satisfy a planning authority, convince an investor, and sell homes off-plan, the visual pack has to work across all three audiences without contradiction. Visualtrick produces coordinated CGI and 3D rendering services from a single master model, so the verified photomontage submitted to the LPA and the photoreal CGI in the investor deck show exactly the same scheme.
The process starts with a scoping call, typically within 48 hours of receiving your brief. Visualtrick reviews source files, confirms viewpoint requirements, and returns a fixed-price quote with a milestone timeline. For architects and developers at any stage from pre-application through to marketing launch, the starting point is the architectural visualisation services page. Send your brief, and Visualtrick will confirm what is needed to get started.
Key takeaways
Matching the visualisation format to the pitch audience and the site sensitivity is the single decision that determines whether your visual pack works as planning evidence, investor material, or sales collateral.
| Point | Details |
|---|---|
| Match format to audience | Define whether the output is for planning, investor, or sales before briefing any format. |
| Apply GLVIA3 proportionality | Reserve Type 4 verified photomontage for sensitive sites; a Type 3 photomontage meets most planning needs. |
| Supply complete source data | Architectural files, survey data, and camera positions must be agreed before production begins to avoid rework. |
| Use one master model | All formats extracted from a single coordinated model keep scale, materials, and context consistent across the pack. |
| Visualtrick for coordinated packs | Visualtrick produces planning-ready and investor-grade visuals from a single workflow, covering all pitch audiences. |
Why proportionality matters more than production value
The instinct on most project teams is to commission the most impressive visual the budget allows. It is the wrong instinct, and experienced planning consultants know it.
A Type 4 verified photomontage submitted for a modest infill scheme in a non-designated area does not strengthen the application. It can actually invite scrutiny, because it signals that the team anticipated a challenge and over-prepared for it. A well-executed Type 3 photomontage, produced from accurate survey data and presented at the correct reproduction size, is the right tool. Spending the saved budget on an additional interior render for the investor pack or a short flythrough for the sales launch produces far more commercial return.
The same logic applies in reverse. An investor pack built on massing models and annotated photographs, when the scheme is at a stage where photoreal CGI is achievable, undersells the project. Investors make decisions partly on confidence, and a photoreal exterior render communicates design resolution in a way that a block model simply cannot.
The practical skill is knowing which threshold you are at, and that is a briefing conversation, not a production decision. Get the audience identification right at the start, and the format choices follow naturally.
Useful sources and further reading
- Visual representation of development proposals (guidance PDF) — the primary technical guidance document covering reproduction size, lens standards, and the full format typology; the reference document for any Type 4 commission
- What does planning visualisation mean in the UK? (Visualtrick) — a plain-language explanation of planning visualisation terminology and format types for UK projects
